Discover creative ways to showcase your LEGO cars on walls with innovative display solutions that enhance your space and celebrate your collection!
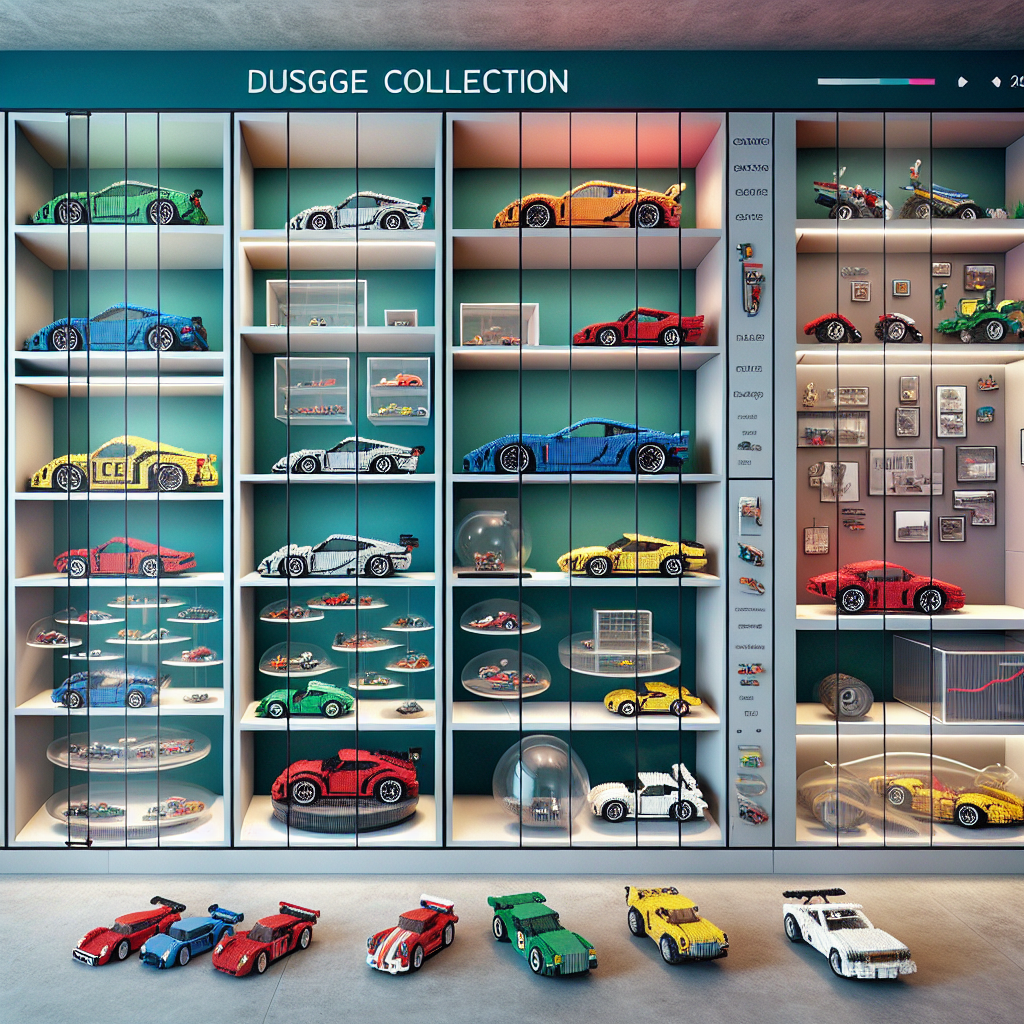
Displaying LEGO cars on walls can be a fun and creative way to showcase your collection while also adding a unique decorative element to your space. Here are some innovative solutions for displaying LEGO cars on walls:
### 1. **Shadow Boxes**
– **Description**: Use shadow boxes to create a 3D display. You can customize the background with LEGO-themed designs or colors.
– **Implementation**: Arrange the cars in a visually appealing way, using different levels or platforms within the box to create depth.
### 2. **Floating Shelves**
– **Description**: Install floating shelves at varying heights to create a dynamic display.
– **Implementation**: Use clear acrylic or glass shelves to give the illusion that the cars are floating. Arrange the cars by size, color, or theme.
### 3. **Magnetic Wall Panels**
– **Description**: Use magnetic paint or panels to create a magnetic wall.
– **Implementation**: Attach small magnets to the base of the LEGO cars, allowing you to easily rearrange them on the wall. This method also allows for easy swapping of cars.
### 4. **LEGO Baseplates**
– **Description**: Mount LEGO baseplates directly onto the wall.
– **Implementation**: Secure the baseplates with adhesive or screws, and then attach your LEGO cars directly to the plates. This allows for easy customization and rearrangement.
### 5. **Picture Frames**
– **Description**: Use deep picture frames to create a gallery-style display.
– **Implementation**: Remove the glass and back of the frame, then attach the cars to the frame backing. You can paint the backing or use LEGO-themed paper for added flair.
### 6. **Pegboard Displays**
– **Description**: Install a pegboard on the wall and use hooks or pegs to hang the cars.
– **Implementation**: Customize the layout by moving the pegs around. You can also paint the pegboard in a color that complements your room.
### 7. **LED Light Displays**
– **Description**: Incorporate LED strip lights into your display for a modern touch.
– **Implementation**: Use shelves or shadow boxes with built-in LED lights to highlight your cars, creating an eye-catching effect, especially in low-light conditions.
### 8. **Themed Dioramas**
– **Description**: Create themed dioramas that incorporate your LEGO cars into a scene.
– **Implementation**: Use a large frame or shadow box to build a miniature landscape (like a city or racetrack) where the cars can be displayed as part of the environment.
### 9. **Wall-mounted Racks**
– **Description**: Design or purchase wall-mounted racks specifically for LEGO cars.
– **Implementation**: These racks can be tiered or have slots for each car, allowing for easy access and visibility.
### 10. **Artistic Wall Murals**
– **Description**: Paint or apply a mural on the wall that complements your LEGO cars.
– **Implementation**: Position the cars against the mural to create a cohesive and artistic display that tells a story.
### 11. **Rotating Display Stands**
– **Description**: Use a rotating display stand mounted on the wall.
– **Implementation**: This allows you to showcase multiple cars in a compact space, and you can easily turn the stand to view different cars.
### 12. **Custom LEGO Car Holders**
– **Description**: Design custom holders using LEGO bricks themselves.
– **Implementation**: Build a structure that can hold the cars securely while also being visually appealing. This can be a fun project that adds a personal touch to your display.
### Conclusion
These innovative solutions not only help you display your LEGO cars but also enhance the aesthetic of your space. Choose a method that fits your style and the available space, and enjoy showcasing your collection in a creative way!
Displaying LEGO cars on walls can be a fun and creative way to showcase your collection. Here are three innovative solutions to consider:
Displaying LEGO cars on walls can be an engaging and visually appealing way to showcase your collection. Here are three innovative solutions to consider:
1. **Shadow Boxes**: Utilize shadow boxes to create a three-dimensional display for your LEGO cars. These boxes can be mounted on the wall at various heights and orientations, allowing for a dynamic arrangement. By incorporating a background that complements the theme of your collection—such as a cityscape or racetrack—you can enhance the visual impact. Additionally, LED strip lighting can be added to illuminate the shadow boxes, highlighting the intricate details of each model.
2. **Floating Shelves**: Install floating shelves to create a sleek and modern display for your LEGO cars. These shelves can be arranged in a staggered pattern to add visual interest and can be painted or stained to match your interior decor. Consider using clear acrylic risers on the shelves to elevate certain models, creating a tiered effect that draws attention to your favorite pieces. This solution allows for easy rearrangement and expansion of your collection as it grows.
3. **Magnetic Display Boards**: For a more interactive approach, consider using magnetic display boards. By attaching small magnets to the base of each LEGO car, you can easily arrange and rearrange them on a metal board mounted to the wall. This method not only allows for flexibility in display but also encourages creativity, as you can create themed arrangements or change the layout frequently. Additionally, you can incorporate decorative elements, such as decals or artwork, on the board to further personalize the display.
These innovative solutions provide a stylish and functional way to showcase your LEGO car collection while enhancing the overall aesthetic of your space.
### 1. **Shadow Box Frames**
**Shadow Box Frames: A Formal Overview**
**Introduction**
Shadow box frames are a specialized type of display case designed to showcase three-dimensional objects, memorabilia, or artwork in a visually appealing manner. Unlike traditional flat frames, shadow boxes provide depth, allowing for the inclusion of various materials and textures, making them ideal for preserving and presenting cherished items.
**Design and Structure**
A shadow box frame typically consists of a deep frame that creates a recessed space, or “shadow,” behind the glass. This depth allows for the arrangement of items at varying distances from the glass, enhancing the visual impact. The frame can be made from various materials, including wood, metal, or composite materials, and is available in a range of finishes to complement the displayed items.
**Applications**
Shadow box frames are versatile and can be used for a variety of purposes, including:
1. **Memorabilia Display**: Ideal for showcasing sports jerseys, medals, awards, or other personal achievements.
2. **Artistic Presentation**: Artists often use shadow boxes to create three-dimensional art pieces, incorporating mixed media and found objects.
3. **Thematic Collections**: Perfect for displaying collections such as stamps, coins, or vintage items, allowing for creative arrangement and storytelling.
4. **Preservation**: Shadow boxes can protect delicate items from dust and damage while allowing for visibility.
**Customization**
Many shadow box frames can be customized to suit individual preferences. Options may include:
– **Matting**: Custom mats can be added to enhance the presentation and provide a backdrop for the displayed items.
– **Lighting**: Integrated lighting can be included to highlight specific elements within the box.
– **Backgrounds**: Various background materials, such as fabric or decorative paper, can be used to enhance the overall aesthetic.
**Conclusion**
Shadow box frames offer a unique and elegant way to display and preserve cherished items, combining functionality with artistic expression. Their versatility and customizable features make them a popular choice for both personal and professional use, allowing individuals to create meaningful displays that tell a story and evoke memories.
Create custom shadow box frames that can hold LEGO cars in a visually appealing way.
Creating custom shadow box frames to display LEGO cars can be a delightful project that combines creativity with a touch of elegance. Here’s a step-by-step guide to designing and constructing visually appealing shadow box frames for your LEGO cars:
### Materials Needed:
1. **Shadow Box Frames**: Choose frames that are deep enough to accommodate the height of the LEGO cars. Consider sizes that can hold multiple cars or a single, larger model.
2. **Backing Board**: A sturdy material like foam board or plywood to serve as the backing for the shadow box.
3. **Display Stands or Mounts**: Clear acrylic stands or custom mounts to hold the LEGO cars in place.
4. **Decorative Elements**: Background paper, fabric, or paint to enhance the visual appeal of the display.
5. **Lighting**: Optional LED strip lights or small spotlights to illuminate the display.
6. **Tools**: Craft knife, ruler, glue, and a drill (if needed for mounting).
### Design Steps:
1. **Select the Frame**:
– Choose a shadow box frame that complements the style of your LEGO cars. Consider colors and finishes that match or contrast nicely with the cars.
2. **Prepare the Backing**:
– Cut the backing board to fit snugly inside the frame. This will serve as the base for your display.
– Paint or cover the backing board with decorative paper or fabric. Consider using a color that enhances the colors of the LEGO cars, such as a neutral tone or a vibrant backdrop.
3. **Plan the Layout**:
– Before securing anything, arrange the LEGO cars on the backing board to determine the best layout. Consider varying heights and angles for visual interest.
– Leave enough space between cars to avoid a cluttered look.
4. **Secure the Cars**:
– Use clear acrylic stands or custom mounts to hold the cars in place. If using mounts, ensure they are securely attached to the backing board.
– For a more permanent solution, you can use strong adhesive to attach the cars directly to the backing board.
5. **Add Decorative Elements**:
– Incorporate additional elements such as miniature roadways, grass, or themed backgrounds (like a cityscape or racetrack) to enhance the display.
– Consider adding labels or small plaques with the name of each car or its specifications for an informative touch.
6. **Incorporate Lighting**:
– If desired, install LED strip lights along the edges of the shadow box or use small spotlights to highlight the cars. Ensure that the lighting is discreet and does not overpower the display.
7. **Assemble the Shadow Box**:
– Once everything is in place and secure, carefully assemble the shadow box by placing the backing board into the frame and securing it.
– Ensure that the glass or acrylic front is clean and free of dust for optimal visibility.
8. **Final Touches**:
– Hang the shadow box on a wall or place it on a shelf. Ensure it is at eye level for the best viewing experience.
– Step back and admire your work! Make any adjustments as necessary to achieve the desired look.
### Tips for a Formal Presentation:
– Choose frames with a sleek, modern design or classic wood finishes for a more formal appearance.
– Maintain a consistent color scheme throughout the display to create a cohesive look.
– Use high-quality materials for both the frame and the backing to enhance the overall presentation.
By following these steps, you can create stunning shadow box frames that not only showcase your LEGO cars but also serve as elegant pieces of art in your home or office.