Discover step-by-step tips to create a stunning themed display frame for your LEGO cars, showcasing your collection in style and creativity!
Creating a themed display frame for LEGO cars can be a fun and creative project. Here’s a step-by-step guide to help you design and build an attractive display that showcases your LEGO car collection:
### Materials Needed:
1. **Display Frame**: You can use a shadow box, a deep picture frame, or build a custom frame from wood.
2. **Background Material**: Choose a theme-appropriate background (e.g., a cityscape, racetrack, or nature scene). You can use printed paper, fabric, or paint.
3. **Base Material**: A sturdy base to hold the LEGO cars, such as foam board, wood, or acrylic.
4. **Mounting Supplies**: Double-sided tape, glue, or LEGO-compatible base plates.
5. **Decorative Elements**: Miniature accessories (trees, buildings, roads), stickers, or paint for added detail.
6. **Tools**: Scissors, a craft knife, ruler, and a hot glue gun (if needed).
### Steps to Create Your Themed Display Frame:
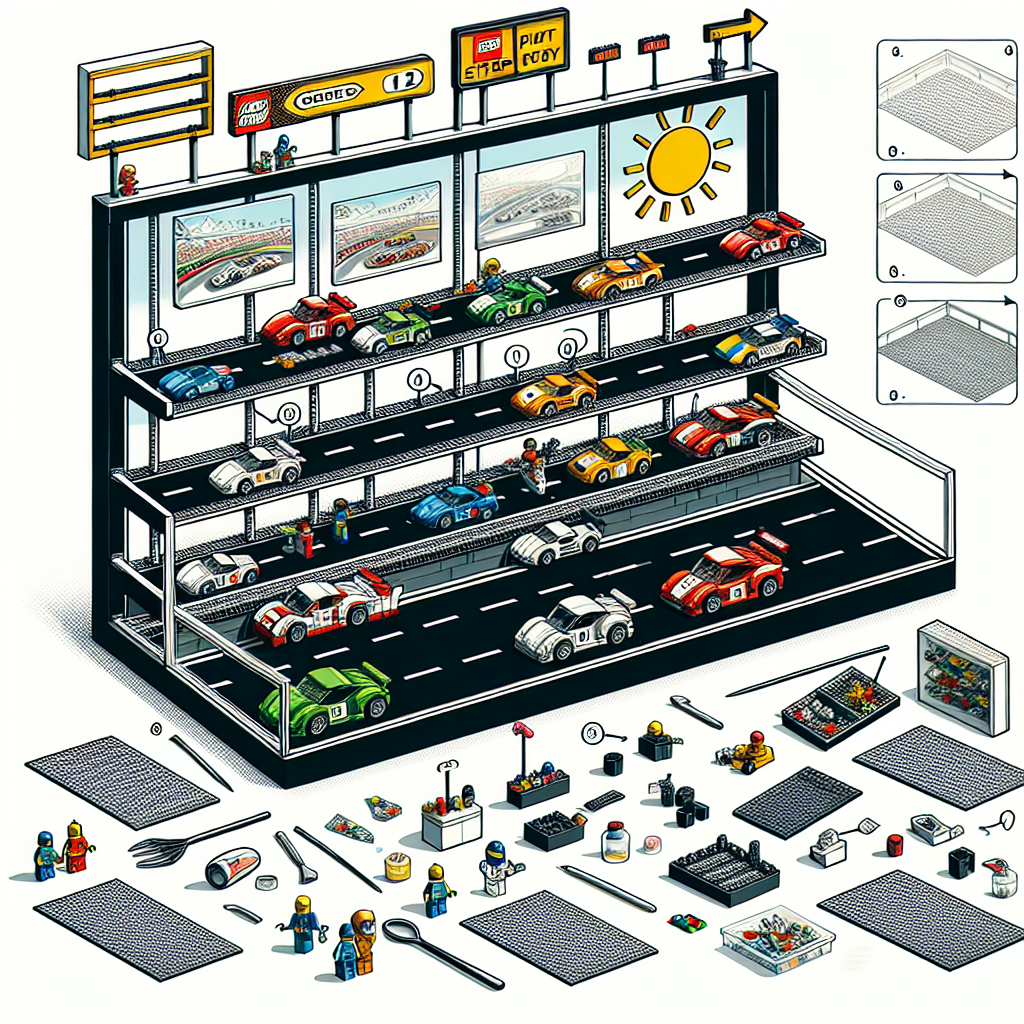
#### 1. Choose a Theme
Decide on a theme for your display. Some ideas include:
– **Cityscape**: Featuring buildings, roads, and traffic lights.
– **Racetrack**: With checkered flags, pit stops, and racing elements.
– **Nature**: Incorporating trees, mountains, and rivers.
#### 2. Prepare the Frame
– If using a pre-made frame, remove the backing and glass (if applicable).
– If building your own frame, cut the wood to size and assemble it using screws or wood glue.
#### 3. Create the Background
– Cut your background material to fit the frame.
– If painting, create a scene that matches your theme. For example, paint a blue sky with clouds for a cityscape or a green landscape for a nature theme.
– Attach the background to the back of the frame using glue or tape.
#### 4. Design the Base
– Cut your base material to fit inside the frame.
– If using LEGO base plates, attach them to the base material.
– Decorate the base to match your theme. For example, you can paint roads or add grass and dirt textures.
#### 5. Arrange the LEGO Cars
– Place your LEGO cars on the base. Experiment with different arrangements until you find one that looks good.
– Secure the cars in place using double-sided tape or glue if you want them to be permanent.
#### 6. Add Decorative Elements
– Incorporate additional elements that enhance your theme. For example:
– **Cityscape**: Add mini buildings, streetlights, and trees.
– **Racetrack**: Include pit crew figures, cones, and flags.
– **Nature**: Use small animals, rocks, and plants.
– Arrange these elements around the LEGO cars to create a cohesive scene.
#### 7. Final Assembly
– Once everything is arranged and secured, carefully place the backing on the frame.
– If using glass, ensure it is clean and free of fingerprints before sealing the frame.
#### 8. Display Your Creation
– Choose a suitable location to hang or place your display frame.
– Consider using wall mounts or stands that complement the theme.
### Tips:
– Use LED strip lights to illuminate the display for added effect.
– Regularly change the arrangement or theme to keep the display fresh and interesting.
– Consider labeling each car with its name or model for an informative touch.
By following these steps, you can create a beautiful and personalized display frame that showcases your LEGO cars in a themed environment. Enjoy your crafting!
Creating a themed display frame for LEGO cars can be a fun and creative project. Here’s a step-by-step guide to help you design and build an attractive display that showcases your LEGO car collection:
### Step-by-Step Guide to Creating a Themed Display Frame for LEGO Cars
Creating a themed display frame for your LEGO car collection can enhance the visual appeal of your models while providing a dedicated space for showcasing your creativity. Follow this formal guide to design and build an attractive display.
#### Materials Needed:
1. **Display Frame**: Choose a shadow box or a deep frame that can accommodate the height of your LEGO cars.
2. **Backing Material**: Use a sturdy board (e.g., foam board, plywood) for the back of the frame.
3. **Decorative Elements**: Consider themed backgrounds (e.g., cityscape, racetrack) and additional decorations (e.g., miniature trees, road signs).
4. **Mounting Supplies**: Use adhesive putty, double-sided tape, or small shelves to secure the LEGO cars.
5. **Lighting**: Optional LED strip lights or small spotlights to enhance visibility.
6. **Tools**: Scissors, craft knife, ruler, and glue.
#### Step 1: Choose a Theme
Decide on a theme that resonates with your collection. Possible themes include:
– Urban cityscape
– Racing circuit
– Off-road adventure
– Vintage car show
#### Step 2: Prepare the Frame
– **Select the Frame**: Choose a frame that complements your theme. A shadow box is ideal for depth.
– **Remove the Backing**: Take off the back of the frame to prepare for the backing material.
#### Step 3: Create the Background
– **Design the Background**: Use printed images or hand-drawn designs that align with your chosen theme. For example, a city skyline for an urban theme or a racetrack for a racing theme.
– **Attach the Background**: Secure the background to the backing material using glue or double-sided tape.
#### Step 4: Arrange the Display
– **Plan the Layout**: Before securing anything, arrange your LEGO cars on the backing to determine the best layout. Consider varying heights and angles for visual interest.
– **Secure the Cars**: Use adhesive putty or double-sided tape to attach the cars to the backing. Ensure they are stable and won’t tip over.
#### Step 5: Add Decorative Elements
– **Incorporate Themed Decor**: Add miniature elements that enhance the theme, such as trees, buildings, or road signs. Secure these with glue or tape.
– **Consider Lighting**: If desired, install LED lights around the frame to highlight the display. Ensure the wiring is discreetly managed.
#### Step 6: Final Assembly
– **Reattach the Frame Backing**: Once everything is in place and secure, reattach the backing to the frame.
– **Hang or Display**: Choose a suitable location to hang or place your display frame, ensuring it is visible and well-lit.
#### Step 7: Maintenance
– **Regular Dusting**: Keep your display clean by dusting it regularly to maintain its appearance.
– **Update as Needed**: Feel free to change the arrangement or add new cars to keep the display fresh and engaging.
### Conclusion
By following these steps, you can create a themed display frame that not only showcases your LEGO car collection but also serves as a decorative piece in your home. Enjoy the process of designing and building your display, and take pride in sharing your passion for LEGO with others.
### Materials Needed:
It seems like your request is incomplete. Could you please provide more context or specify what materials you need? For example, are you looking for materials for a specific project, event, or topic? Additionally, if you need a formal tone, please clarify the subject matter so I can assist you appropriately. Thank you!
**Display Frame**: You can use a shadow box, a deep picture frame, or build a custom frame from wood
**Display Frame Options for Art and Memorabilia**
When it comes to showcasing your cherished art pieces or memorabilia, selecting the right display frame is essential for both protection and aesthetics. Here are three formal options to consider:
1. **Shadow Box**: A shadow box is a versatile display option that allows for the presentation of three-dimensional objects. These frames are typically deeper than standard frames, providing ample space for items such as medals, collectibles, or layered artwork. Shadow boxes can be customized with various backgrounds and matting to enhance the visual appeal of the displayed items.
2. **Deep Picture Frame**: A deep picture frame offers a more traditional approach while still accommodating thicker artworks or layered pieces. These frames can be found in various styles and finishes, allowing you to match them to your decor. The depth of the frame not only adds dimension but also protects the artwork from dust and damage.
3. **Custom Wood Frame**: For a truly unique presentation, consider building a custom frame from wood. This option allows for complete control over the dimensions, style, and finish of the frame. Whether you prefer a rustic look or a sleek modern design, custom wood framing can elevate the presentation of your artwork while ensuring it is securely housed.
Each of these options provides a formal and elegant way to display your art and memorabilia, enhancing their beauty while ensuring their preservation.