Discover how to build and customize your own LEGO cars with our step-by-step guide. Unleash your creativity and drive your imagination!
Building and customizing your own LEGO cars can be a fun and creative activity! Here’s a step-by-step guide to help you get started:
### Step 1: Gather Your Materials
– **LEGO Bricks**: Collect a variety of LEGO bricks, including standard bricks, plates, wheels, axles, and any special pieces you might want to use (like windshields, spoilers, etc.).
– **Baseplate**: A flat baseplate can help you build a sturdy foundation for your car.
– **Tools**: While LEGO doesn’t require tools, having a small container or tray can help keep your pieces organized.
### Step 2: Plan Your Design
– **Choose a Style**: Decide what type of car you want to build (sports car, truck, classic car, etc.).
– **Sketch Your Idea**: If you’re feeling artistic, sketch your design on paper. This can help you visualize the proportions and features you want.
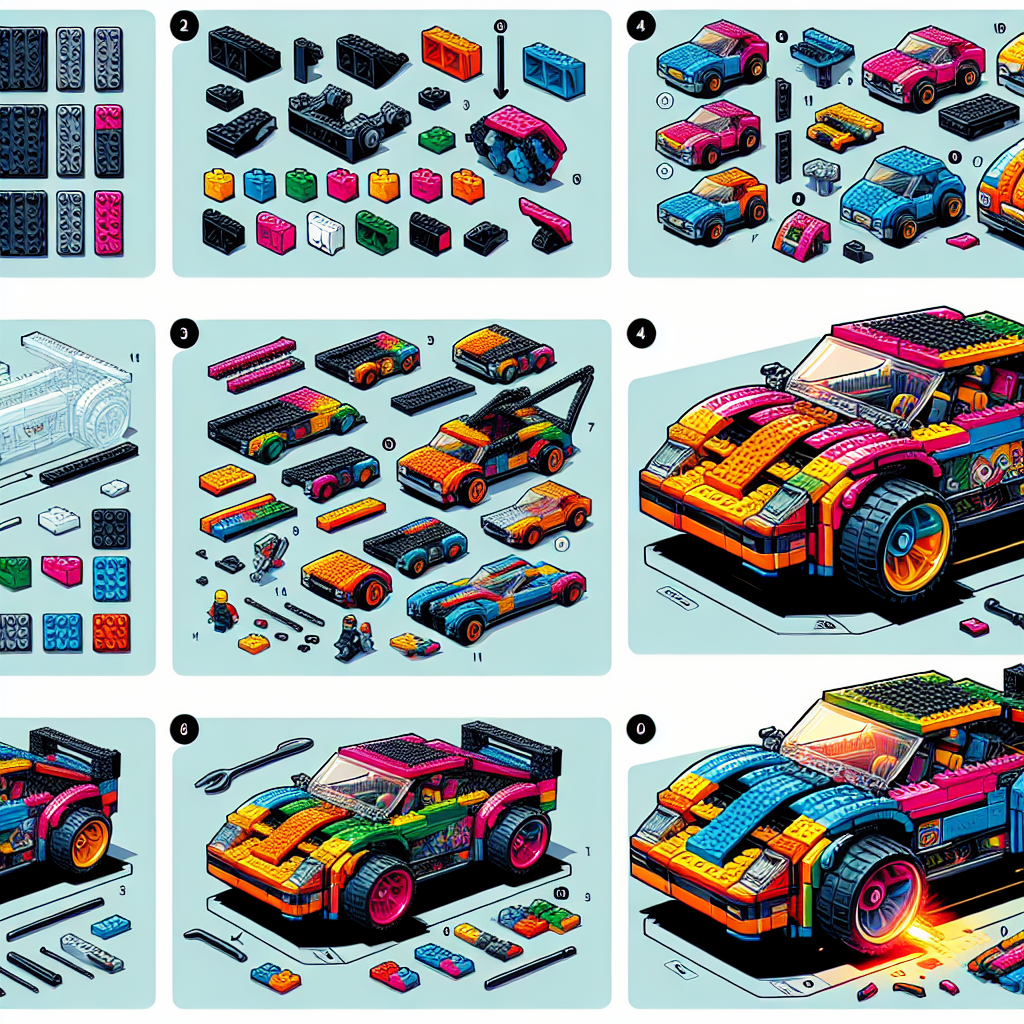
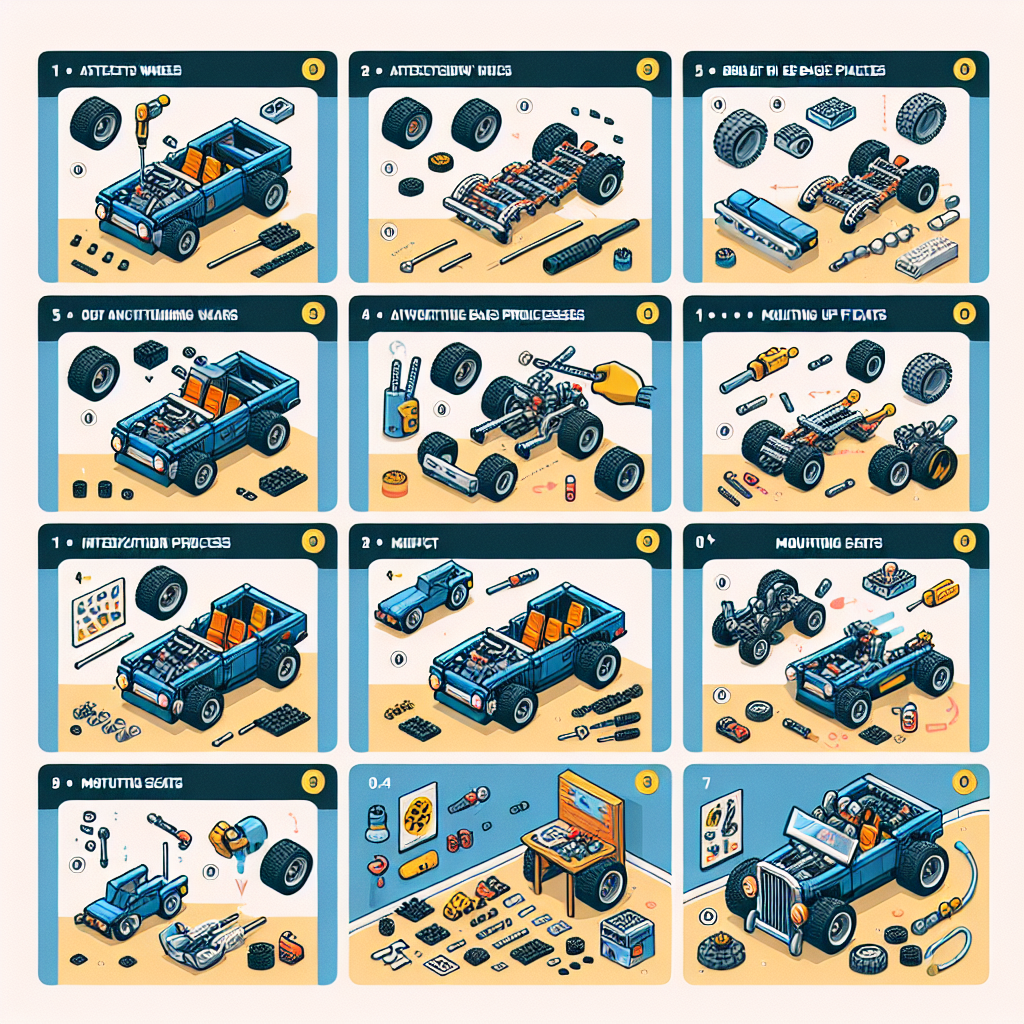
### Step 3: Build the Chassis
1. **Create the Base**: Start with a flat base using larger plates. This will be the foundation of your car.
2. **Add Axles**: Attach the axles to the base. Make sure they are positioned correctly to allow the wheels to spin freely.
3. **Attach Wheels**: Snap the wheels onto the axles. Ensure they are secure and can rotate without obstruction.
### Step 4: Build the Body
1. **Construct the Frame**: Use bricks to build the sides and back of the car. You can create a simple rectangular shape or get creative with curves and angles.
2. **Add Details**: Incorporate features like doors, windows, and a roof. Use transparent bricks for windows and consider adding a windshield piece for a more realistic look.
3. **Customize**: Add unique elements like spoilers, decals, or special colors to make your car stand out.
### Step 5: Interior Design (Optional)
– If you want to add an interior, consider including seats, a steering wheel, and dashboard elements. Use smaller bricks and plates to create these details.
### Step 6: Final Touches
– **Check Stability**: Ensure all parts are securely attached and that the car is stable.
– **Test the Wheels**: Roll the car on a flat surface to see how well it moves. Make adjustments if necessary.
– **Add Accessories**: Consider adding accessories like headlights, taillights, or even a driver figure.
### Step 7: Show Off Your Creation
– Once you’re satisfied with your LEGO car, display it proudly! You can also take photos to share with friends or online LEGO communities.
### Tips for Customization
– **Experiment with Colors**: Use different colored bricks to create a unique look.
– **Incorporate Technic Pieces**: If you have LEGO Technic pieces, consider using them for more advanced features like working steering or suspension.
– **Use Online Resources**: Look for inspiration from LEGO car designs online or in LEGO building books.
### Conclusion
Building and customizing LEGO cars is all about creativity and experimentation. Don’t be afraid to take apart and rebuild your car as you come up with new ideas. Enjoy the process and have fun with your LEGO creations!
Building and customizing your own LEGO cars can be a fun and creative activity! Here’s a step-by-step guide to help you get started:
### Step-by-Step Guide to Building and Customizing Your Own LEGO Cars
Building and customizing LEGO cars can be an enjoyable and imaginative endeavor. This guide provides a structured approach to help you create your own unique designs.
#### Step 1: Gather Your Materials
– **LEGO Bricks**: Collect a variety of LEGO bricks, including standard bricks, plates, wheels, and any specialized pieces you may want to incorporate.
– **Baseplate**: Consider using a baseplate as the foundation for your car.
– **Tools**: While LEGO bricks do not require tools, having a flat surface to work on can enhance your building experience.
#### Step 2: Plan Your Design
– **Conceptualization**: Before you start building, sketch your design on paper or visualize it in your mind. Consider the type of car you want to create (e.g., sports car, truck, or futuristic vehicle).
– **Dimensions**: Determine the size of your car. This will help you decide how many bricks you will need and the overall structure.
#### Step 3: Build the Chassis
– **Foundation**: Start by constructing the chassis, which serves as the car’s base. Use larger bricks to create a sturdy foundation.
– **Wheels**: Attach wheels to the chassis. Ensure they are positioned correctly to allow for smooth movement. You may want to use LEGO wheel hubs for better stability.
#### Step 4: Create the Body
– **Structure**: Begin building the body of the car by stacking bricks on top of the chassis. Use a combination of different brick sizes and shapes to achieve your desired look.
– **Aerodynamics**: Consider the aerodynamics of your design. Smoother shapes may enhance the aesthetic appeal and functionality of your car.
#### Step 5: Customize Features
– **Color Scheme**: Choose a color scheme that reflects your personal style. You can mix and match colors to create a vibrant design.
– **Details**: Add details such as headlights, taillights, and decals. You can use smaller bricks or specialized pieces to enhance the realism of your car.
– **Interior**: If desired, create an interior by adding seats, a steering wheel, and other features that enhance the overall design.
#### Step 6: Test and Refine
– **Functionality**: Once your car is built, test its functionality. Roll it on a flat surface to ensure the wheels turn smoothly.
– **Adjustments**: Make any necessary adjustments to improve performance or aesthetics. This may involve reinforcing certain areas or modifying the design.
#### Step 7: Showcase Your Creation
– **Display**: Once you are satisfied with your LEGO car, consider displaying it on a shelf or in a dedicated space.
– **Photography**: Capture images of your creation to share with friends or on social media platforms. This can inspire others to embark on their own LEGO building adventures.
#### Conclusion
Building and customizing LEGO cars is a rewarding activity that fosters creativity and problem-solving skills. By following this guide, you can create a unique vehicle that reflects your personal style and imagination. Enjoy the process and happy building!
### Step 1: Gather Your Materials
### Step 1: Gather Your Materials
To ensure a successful and efficient process, it is essential to collect all necessary materials prior to commencing your task. This preparation will facilitate a smoother workflow and minimize interruptions. Below is a comprehensive list of items you may need, depending on the nature of your project:
1. **Documentation**:
– Relevant manuals, guidelines, or reference materials.
– Any necessary forms or templates.
2. **Tools and Equipment**:
– Specific tools required for the task (e.g., writing instruments, measuring devices, or technical equipment).
– Safety gear, if applicable (e.g., gloves, goggles, or masks).
3. **Technology**:
– A computer or device with the necessary software installed.
– Access to the internet for research or communication purposes.
4. **Supplies**:
– Stationery items such as paper, pens, or markers.
– Any additional materials specific to your project (e.g., art supplies, construction materials, etc.).
5. **Workspace**:
– A clean and organized area conducive to your work.
– Adequate lighting and seating arrangements.
6. **Support Resources**:
– Contact information for colleagues or experts who may provide assistance.
– Access to online forums or communities related to your project.
By systematically gathering these materials, you will be well-prepared to proceed with your task efficiently and effectively.
– **LEGO Bricks**: Collect a variety of LEGO bricks, including wheels, axles, and any special pieces you might want to use (like windshields, spoilers, etc.)
To embark on your LEGO building project, it is essential to gather a diverse assortment of LEGO bricks. This collection should include, but not be limited to, the following components:
1. **Standard Bricks**: A variety of sizes and colors to form the foundational structure of your model.
2. **Wheels**: Ensure you have an adequate selection of wheels to facilitate movement, including different sizes and styles.
3. **Axles**: Collect various axles that will serve as the support for your wheels, allowing for smooth rotation.
4. **Specialized Pieces**: Consider acquiring unique elements such as windshields, spoilers, and other decorative or functional components that will enhance the aesthetic and performance of your build.
By assembling this comprehensive array of LEGO pieces, you will be well-prepared to create a dynamic and visually appealing model.