Learn how to build a LEGO car set from scratch with our step-by-step guide! Unleash your creativity and design a unique vehicle today!
Building a LEGO car set from scratch can be a fun and creative project! Here’s a step-by-step guide to help you design and construct your own LEGO car:
### Step 1: Gather Your Materials
– **LEGO Bricks**: Collect a variety of LEGO bricks, including:
– Base plates
– Wheels and axles
– Bricks for the body
– Decorative pieces (lights, windows, etc.)
– **Tools**: You won’t need any special tools, just your hands and creativity!
### Step 2: Plan Your Design
– **Choose a Type of Car**: Decide whether you want to build a sports car, a truck, a classic car, or something else.
– **Sketch Your Design**: Draw a rough sketch of your car to visualize the shape and features you want to include.
– **Consider Size**: Determine how big you want your car to be. This will help you decide how many bricks you need.
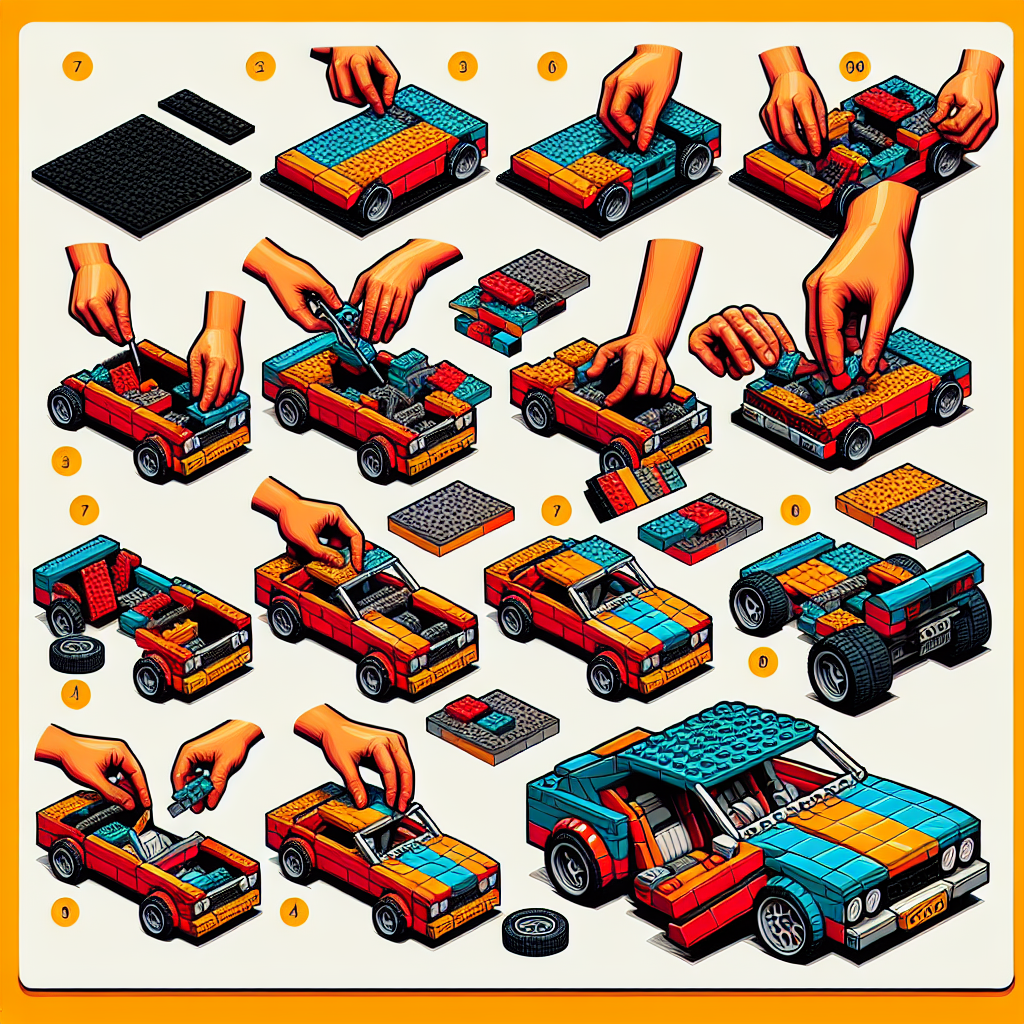
### Step 3: Build the Chassis
– **Create the Base**: Start with a flat base plate that will serve as the foundation of your car.
– **Add Axles**: Attach the wheels using axles. Make sure they are positioned correctly so that the car can roll smoothly.
– **Reinforce the Structure**: Use additional bricks to strengthen the chassis and ensure it can support the weight of the car.
### Step 4: Construct the Body
– **Build Up the Sides**: Use bricks to create the sides of the car. You can choose to make it a two-door, four-door, or even a convertible.
– **Add Details**: Incorporate features like windows, doors, and a roof. You can use transparent bricks for windows and special pieces for headlights.
– **Customize**: Add any unique features you want, such as spoilers, decals, or special colors.
### Step 5: Add the Interior
– **Seats**: Create seats using smaller bricks or specialized LEGO seat pieces.
– **Dashboard**: Use flat pieces to create a dashboard and add details like a steering wheel.
– **Accessories**: Consider adding small details like a gear shift, cup holders, or even a radio.
### Step 6: Final Touches
– **Test the Wheels**: Make sure the wheels spin freely and the car rolls well.
– **Decorate**: Add any final decorative elements, such as stickers or custom paint jobs (if you’re using paint).
– **Check Stability**: Ensure that all parts are securely attached and that the car is stable.
### Step 7: Showcase Your Creation
– **Display**: Find a nice spot to display your LEGO car.
– **Take Photos**: Document your creation by taking photos from different angles.
– **Share**: If you’re proud of your build, consider sharing it with friends or online LEGO communities!
### Tips for Success
– **Experiment**: Don’t be afraid to try different designs and configurations. LEGO is all about creativity!
– **Use Online Resources**: Look for inspiration from existing LEGO car sets or online tutorials.
– **Be Patient**: Building from scratch can take time, so enjoy the process!
With these steps, you should be well on your way to creating your very own LEGO car set. Happy building!
Building a LEGO car set from scratch can be a fun and creative project! Here’s a step-by-step guide to help you get started:
### Step-by-Step Guide to Building a LEGO Car Set from Scratch
#### Step 1: Gather Materials
– **LEGO Bricks**: Collect a variety of LEGO bricks, including standard bricks, plates, wheels, axles, and any specialized pieces you may want to incorporate (e.g., windshields, headlights).
– **Baseplate**: Choose a baseplate to serve as the foundation for your car.
– **Tools**: While LEGO sets typically do not require tools, having a flat surface and good lighting will enhance your building experience.
#### Step 2: Plan Your Design
– **Conceptualization**: Decide on the type of car you wish to build (e.g., sports car, truck, or classic car). Sketching your design on paper can help visualize the final product.
– **Dimensions**: Consider the size of your car. Determine the length, width, and height based on the available bricks and your design.
#### Step 3: Create the Chassis
– **Base Structure**: Start by constructing the chassis, which will serve as the car’s frame. Use larger bricks or plates to create a sturdy base.
– **Wheel Placement**: Ensure that you leave space for the wheels and axles. Typically, the wheels should be positioned at the corners of the chassis for stability.
#### Step 4: Add Wheels and Axles
– **Axle Installation**: Insert the axles through the designated holes in the chassis. Ensure they are secure and can rotate freely.
– **Attach Wheels**: Firmly attach the wheels to the ends of the axles. Test the movement to ensure the car rolls smoothly.
#### Step 5: Build the Body
– **Side Panels**: Construct the side panels of the car using bricks or plates. You can choose to create a sleek design or a more rugged appearance based on your concept.
– **Front and Rear**: Add the front and rear sections of the car. Consider incorporating features such as a grille, headlights, and a rear bumper.
#### Step 6: Design the Interior
– **Seating**: Create seats using smaller bricks or specialized pieces. Position them within the chassis, ensuring they are accessible.
– **Dashboard**: Add a dashboard using flat pieces to represent controls. You may also include steering wheels or other interior details.
#### Step 7: Final Touches
– **Windshield and Roof**: If desired, add a windshield using transparent pieces. You can also create a roof or leave it open for a convertible design.
– **Decorative Elements**: Personalize your car with stickers, decals, or additional LEGO accessories to enhance its appearance.
#### Step 8: Test and Refine
– **Functionality Check**: Roll your car on a flat surface to ensure it moves smoothly. Make any necessary adjustments to improve performance.
– **Aesthetic Review**: Step back and evaluate the overall look of your car. Make any final adjustments to enhance its design.
#### Step 9: Document Your Creation
– **Photography**: Take photos of your completed LEGO car from various angles. This will allow you to share your creation with others or replicate it in the future.
– **Instructions**: Consider writing down the steps you took to build your car, including any unique techniques or modifications you made.
### Conclusion
Building a LEGO car set from scratch is an engaging and rewarding project that encourages creativity and problem-solving. By following these steps, you can create a unique vehicle that reflects your personal style and design preferences. Enjoy the building process and let your imagination drive your creation!
### Step 1: Gather Your Materials
### Step 1: Gather Your Materials
To ensure a successful and efficient process, it is essential to collect all necessary materials prior to commencing your project or task. This preparation will facilitate a smoother workflow and minimize interruptions. Below is a comprehensive list of items you may need to gather, depending on the nature of your undertaking:
1. **Documentation**:
– Project guidelines or specifications
– Relevant research materials or references
– Any necessary forms or templates
2. **Tools and Equipment**:
– Specific tools required for the task (e.g., software, hardware, or manual tools)
– Safety equipment, if applicable (e.g., gloves, goggles)
3. **Supplies**:
– Materials needed for execution (e.g., paper, writing instruments, or digital resources)
– Any consumables that may be required (e.g., ink, batteries)
4. **Workspace**:
– A designated area that is organized and conducive to productivity
– Access to necessary technology (e.g., computer, printer, internet connection)
5. **Support Resources**:
– Contact information for team members or collaborators
– Access to technical support or customer service, if needed
By systematically gathering these materials, you will be well-prepared to proceed with your project, ensuring that you have everything at your disposal to achieve your objectives efficiently.
– **LEGO Bricks**: Collect a variety of LEGO bricks, including:
Certainly! When collecting LEGO bricks, it’s important to consider a variety of types and categories to enhance your collection. Here’s a formal breakdown of the types of LEGO bricks you might want to include:
1. **Standard Bricks**:
– **2×4 Bricks**: The classic brick that is a staple in any collection.
– **1×2, 1×3, 1×4, 2×2 Bricks**: Various sizes for versatility in building.
2. **Specialty Bricks**:
– **Curved Bricks**: For creating rounded structures.
– **Sloped Bricks**: Useful for roofs and angled surfaces.
– **Transparent Bricks**: For windows and other clear elements.
3. **Plates**:
– **Standard Plates**: 1×1, 1×2, 2×2, 2×4, etc., for building bases and layers.
– **Modified Plates**: Plates with studs or other features for unique building options.
4. **Tiles**:
– **Flat Tiles**: 1×1, 1×2, 2×2, etc., for smooth surfaces and detailing.
– **Printed Tiles**: Tiles with designs for added detail.
5. **Bricks with Special Features**:
– **Hinges**: For creating movable parts.
– **Technic Bricks**: For advanced building techniques and mechanisms.
6. **Minifigures**:
– **Standard Minifigures**: A variety of characters to enhance playability.
– **Special Edition Minifigures**: Limited editions or themed figures.
7. **Accessories**:
– **Tools and Weapons**: For minifigures to enhance storytelling.
– **Vehicles and Animals**: To add diversity to your builds.
8. **Baseplates**:
– **Large Baseplates**: For foundational structures.
– **Small Baseplates**: For smaller builds or dioramas.
9. **Themed Sets**:
– **City Sets**: For urban environments.
– **Fantasy Sets**: Such as castles or mythical creatures.
– **Space Sets**: For futuristic builds.
10. **Storage Solutions**:
– **Organizers**: To keep your collection sorted and accessible.
– **Display Cases**: For showcasing your favorite builds or minifigures.
By collecting a diverse range of LEGO bricks and accessories, you can enhance your building experience and create a wide variety of structures and scenes. Happy building!