Learn how to build a racing LEGO F1 car with our step-by-step guide! Unleash your creativity and watch your creation zoom around the track!
Building a LEGO F1 car that can race involves a combination of creativity, engineering, and understanding of basic mechanics. Here’s a step-by-step guide to help you create a simple LEGO F1 car that can move:
### Materials Needed:
– LEGO bricks (various sizes)
– LEGO wheels and axles
– LEGO Technic pieces (for better stability and movement)
– A LEGO motor (optional, for powered movement)
– A battery pack (if using a motor)
– A flat surface for racing
### Step-by-Step Instructions:
#### Step 1: Design the Chassis
1. **Base Structure**: Start with a flat base using LEGO plates. This will be the chassis of your car. A rectangular shape is ideal.
2. **Reinforcement**: Use additional bricks to reinforce the chassis. Make sure it’s sturdy enough to hold the weight of the wheels and any additional components.
#### Step 2: Add Wheels
1. **Axles**: Attach axles to the chassis. You can use LEGO Technic axles for better stability.
2. **Wheels**: Attach wheels to the ends of the axles. Ensure they spin freely and are securely attached.
#### Step 3: Build the Body
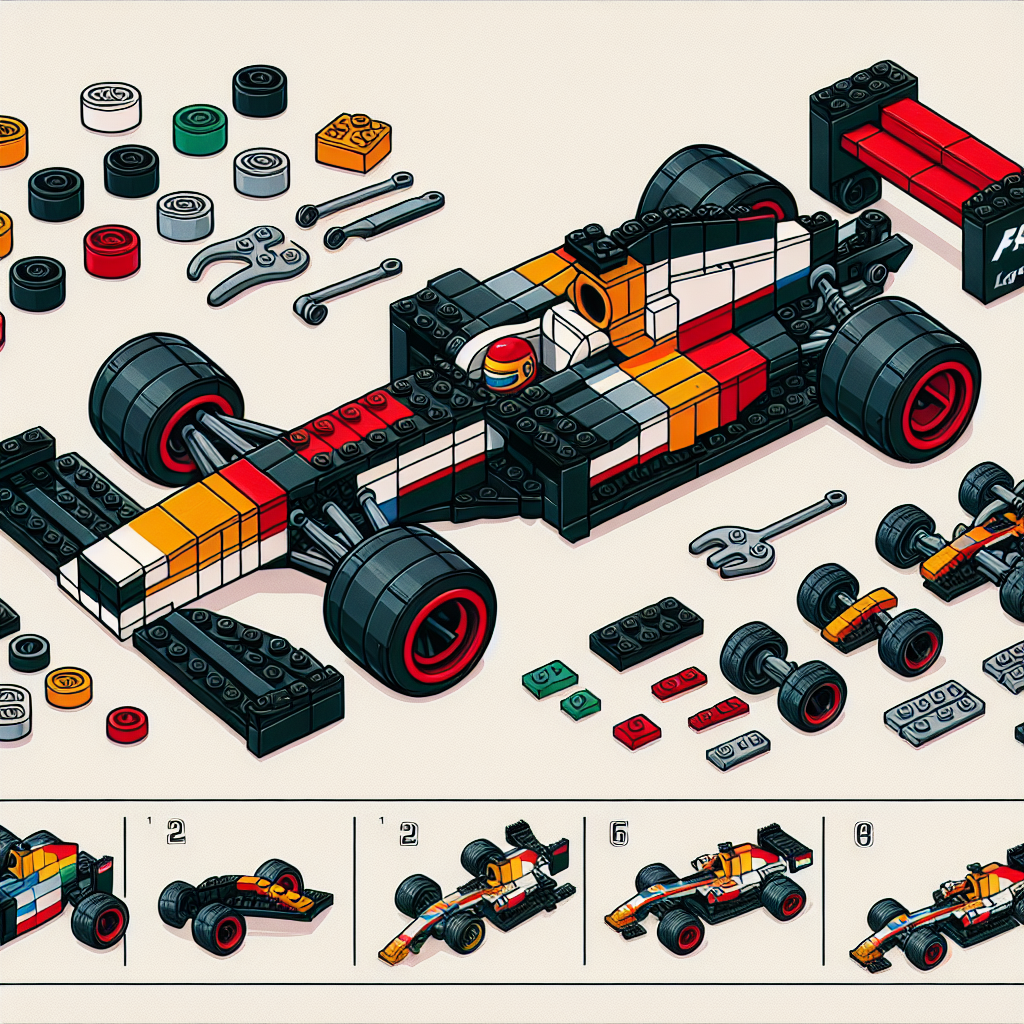
1. **F1 Shape**: Use LEGO bricks to create the aerodynamic shape of an F1 car. This typically includes a low profile and a pointed front.
2. **Cockpit**: Create a cockpit area using transparent bricks for the windshield. You can also add a seat for a mini-figure if desired.
3. **Details**: Add details like side mirrors, a rear wing, and sponsor stickers (you can create these with paper).
#### Step 4: Add a Motor (Optional)
1. **Motor Placement**: If you want your car to be powered, place a LEGO motor on the chassis. Ensure it’s securely attached.
2. **Connect the Wheels**: Use gears or a belt system to connect the motor to the rear wheels. This will allow the motor to drive the wheels.
3. **Battery Pack**: Attach a battery pack to power the motor. Make sure it’s easily accessible for turning on and off.
#### Step 5: Test and Adjust
1. **Testing**: Place your car on a flat surface and test its movement. If it’s powered, turn on the motor and see how it performs.
2. **Adjustments**: Make any necessary adjustments to improve speed or stability. This could involve changing the weight distribution or modifying the wheel alignment.
#### Step 6: Race!
1. **Set Up a Track**: Create a simple track using tape or other markers on the ground.
2. **Race Against Friends**: Compete with friends to see whose LEGO F1 car is the fastest!
### Tips:
– **Aerodynamics**: Focus on making your car as aerodynamic as possible to reduce drag.
– **Weight Distribution**: Keep the weight low and centered for better stability.
– **Experiment**: Don’t be afraid to try different designs and configurations. The beauty of LEGO is in its versatility!
### Conclusion
Building a LEGO F1 car that races can be a fun and educational project. It allows you to explore concepts of engineering, physics, and design while enjoying the creative process. Happy building!
Building a LEGO F1 car that can race involves a combination of creativity, engineering, and understanding of basic mechanics. Here’s a step-by-step guide to help you create your own LEGO F1 car:
### Step-by-Step Guide to Building a LEGO F1 Car
#### Introduction
Building a LEGO F1 car is an engaging project that combines creativity, engineering principles, and an understanding of basic mechanics. This guide will provide you with a structured approach to designing and constructing your own LEGO F1 car.
#### Materials Required
1. **LEGO Bricks**: A variety of bricks, including standard bricks, plates, and specialized pieces (e.g., wheels, axles).
2. **Wheels and Tires**: Four wheels and corresponding tires suitable for racing.
3. **Base Plate**: A sturdy base to build your car upon.
4. **Axles**: To connect the wheels to the chassis.
5. **Steering Mechanism**: Optional, for added functionality.
6. **Decorative Elements**: Stickers or additional bricks for aesthetics.
#### Step 1: Design the Chassis
1. **Select a Base Plate**: Choose a base plate that will serve as the foundation of your car. A rectangular shape is ideal for stability.
2. **Build the Frame**: Use LEGO bricks to create a rectangular frame on the base plate. Ensure it is sturdy enough to support the weight of the car and any additional components.
#### Step 2: Add the Wheels
1. **Attach Axles**: Insert axles through the designated holes in the base plate, ensuring they are parallel and evenly spaced.
2. **Mount the Wheels**: Secure the wheels onto the ends of the axles. Ensure they rotate freely without obstruction.
#### Step 3: Construct the Body
1. **Build the Car Body**: Use bricks to create the body of the car, starting from the front and working towards the back. Consider aerodynamics in your design.
2. **Incorporate a Cockpit**: Design a cockpit area for the driver. You can use a small LEGO figure to represent the driver.
#### Step 4: Implement a Steering Mechanism (Optional)
1. **Create a Steering System**: If desired, design a simple steering mechanism using additional bricks and a steering wheel. This can be achieved by connecting the front wheels to a pivot point.
2. **Test the Steering**: Ensure that the steering mechanism allows for smooth turning without hindering the car’s movement.
#### Step 5: Add Decorative Elements
1. **Customize the Design**: Use stickers, colored bricks, or decals to personalize your F1 car. Consider adding sponsor logos or racing numbers for authenticity.
2. **Enhance Aerodynamics**: Add elements such as spoilers or side skirts to improve the car’s aerodynamic profile.
#### Step 6: Test and Refine
1. **Conduct Initial Tests**: Place your car on a flat surface and push it to test its movement. Observe how well it rolls and whether any adjustments are needed.
2. **Make Adjustments**: If the car does not perform as expected, consider modifying the weight distribution, wheel alignment, or body design.
#### Conclusion
Building a LEGO F1 car is a rewarding project that allows for creativity and engineering exploration. By following this guide, you can create a functional and visually appealing model that embodies the spirit of Formula 1 racing. Enjoy the process of building, testing, and refining your design!
### Materials Needed:
It seems like your request is incomplete. Could you please provide more context or specify what materials you need? For example, are you looking for materials for a specific project, event, or topic? This will help me assist you better.
– LEGO bricks (various sizes)
LEGO bricks, available in a variety of sizes, are versatile construction elements that facilitate creative building and design. These interlocking plastic pieces are engineered to provide stability and ease of assembly, making them suitable for both individual and collaborative projects. The diverse range of sizes allows for intricate designs and structures, catering to different skill levels and age groups. Whether used for educational purposes, artistic expression, or recreational activities, LEGO bricks serve as an effective medium for fostering creativity, problem-solving, and fine motor skills. Their formal application extends to architectural models, engineering prototypes, and educational tools, highlighting their significance in both play and learning environments.