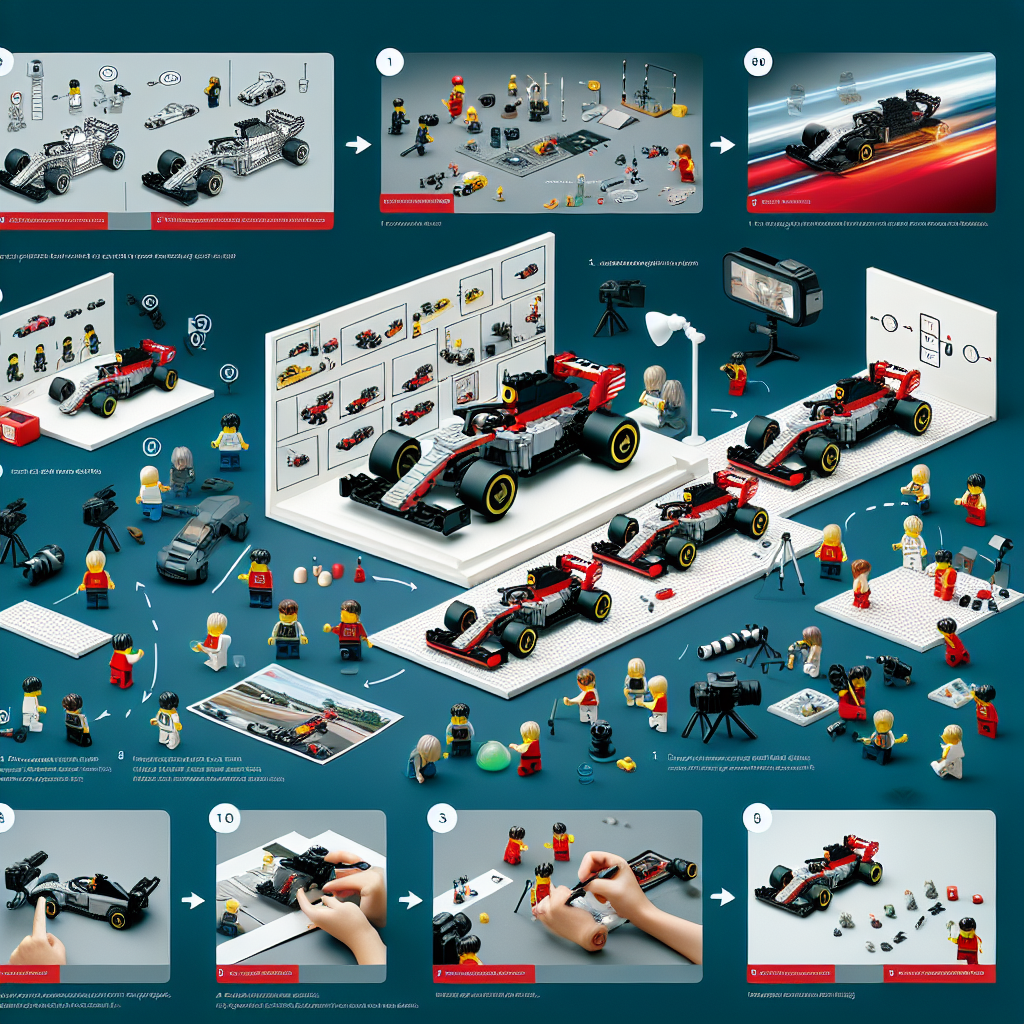
Creating a stop-motion animation with LEGO F1 cars can be a fun and creative project! Here’s a step-by-step guide to help you get started:
### Materials Needed:
1. **LEGO F1 Cars**: You can either use official LEGO sets or build your own custom F1 cars.
2. **Camera**: A smartphone, tablet, or digital camera that can take still photos.
3. **Tripod**: To keep your camera steady during shooting.
4. **Stop-Motion Software/App**: There are several options available, such as Stop Motion Studio, Dragonframe, or iMotion.
5. **Lighting**: Good lighting is essential for clear images. Use natural light or lamps to ensure your scene is well-lit.
6. **Background and Set**: Create a racetrack or a suitable background for your animation using LEGO bricks, cardboard, or printed images.
### Steps to Create Your Animation:
#### 1. **Plan Your Animation**
– **Storyboard**: Sketch out a simple storyboard to visualize the scenes you want to create. Decide on the length of your animation and the key actions (e.g., cars racing, overtaking, pit stops).
– **Script**: Write down any dialogue or sound effects you want to include.
#### 2. **Set Up Your Scene**
– **Build the Track**: Create a racetrack using LEGO bricks. You can design it with curves, straightaways, and pit stops.
– **Arrange the Background**: Set up a background that complements your scene. This could be a crowd, a pit crew, or a scenic backdrop.
– **Position Your Cars**: Place your LEGO F1 cars at the starting line or wherever you want them to begin.
#### 3. **Set Up Your Camera**
– **Mount Your Camera**: Use a tripod to keep your camera steady. Make sure it’s focused on the action area.
– **Frame Your Shot**: Adjust the camera angle to capture the best view of the track and cars.
#### 4. **Lighting**
– Ensure your scene is well-lit. Avoid harsh shadows and make sure the lighting is consistent throughout the shoot.
#### 5. **Start Shooting**
– **Take Photos**: Move your LEGO cars slightly for each frame (about 1-2 cm for each movement). Take a photo after each small movement.
– **Consistency**: Keep the camera and lighting consistent to maintain a smooth look in your animation.
#### 6. **Edit Your Animation**
– **Import Photos**: Load your photos into your stop-motion software.
– **Adjust Frame Rate**: Set the frame rate (typically 12-24 frames per second works well for smooth animations).
– **Add Sound Effects/Music**: If desired, add sound effects like engine noises, crowd cheers, or background music.
#### 7. **Export Your Animation**
– Once you’re satisfied with your animation, export it in your desired format (MP4, AVI, etc.).
#### 8. **Share Your Work**
– Share your stop-motion animation on social media platforms, YouTube, or with friends and family!
### Tips for Success:
– **Patience is Key**: Stop-motion can be time-consuming, so take your time with each frame.
– **Experiment**: Try different angles, speeds, and movements to see what works best for your story.
– **Practice**: The more you practice, the better your animations will become!
Enjoy the process of creating your LEGO F1 stop-motion animation!
Creating a stop-motion animation with LEGO F1 cars can be a fun and creative project! Here’s a step-by-step guide to help you get started:
Creating a stop-motion animation with LEGO F1 cars can be an enjoyable and rewarding project. Below is a formal step-by-step guide to assist you in the process:
### Step 1: Conceptualization
1. **Define Your Story**: Determine the narrative or theme of your animation. Consider elements such as the setting, characters, and the overall message you wish to convey.
2. **Storyboard**: Sketch a storyboard to visualize the sequence of events. This will serve as a blueprint for your animation.
### Step 2: Gather Materials
1. **LEGO F1 Cars**: Assemble the necessary LEGO F1 car models. Ensure you have all the required pieces and accessories.
2. **Camera**: Select a camera or smartphone with good image quality. A tripod is recommended to keep the camera steady.
3. **Lighting**: Set up adequate lighting to ensure consistent brightness throughout the animation. Natural light or softbox lights can be effective.
4. **Background and Props**: Create or select a suitable background for your scene. You may also want to include additional props to enhance the environment.
### Step 3: Set Up Your Scene
1. **Arrange the Background**: Position your background and any props in a way that complements your story.
2. **Position the LEGO Cars**: Place the LEGO F1 cars in their starting positions. Ensure they are stable and will not easily be knocked over during filming.
### Step 4: Capture the Animation
1. **Frame-by-Frame Shooting**: Begin capturing your animation by taking a photo for each slight movement of the LEGO cars. A common frame rate for stop-motion is 12 to 24 frames per second, so plan accordingly.
2. **Small Adjustments**: Move the cars incrementally between each shot. Small adjustments will create smoother motion in the final product.
3. **Consistency**: Maintain consistent lighting and camera angles throughout the process to ensure a cohesive look.
### Step 5: Edit the Animation
1. **Import Photos**: Transfer the captured images to your computer and import them into a video editing software or a dedicated stop-motion animation application.
2. **Sequence the Frames**: Arrange the images in the correct order and adjust the timing to achieve the desired speed of motion.
3. **Add Sound Effects and Music**: Consider incorporating sound effects and background music to enhance the viewing experience.
### Step 6: Finalize and Share
1. **Review and Edit**: Watch the animation multiple times to identify any areas that may need adjustments. Make necessary edits to improve the flow and overall quality.
2. **Export the Video**: Once satisfied with the final product, export the animation in your desired format.
3. **Share Your Work**: Share your completed stop-motion animation with friends, family, or on social media platforms to showcase your creativity.
### Conclusion
Creating a stop-motion animation with LEGO F1 cars requires careful planning, creativity, and patience. By following these steps, you can produce an engaging and visually appealing animation that reflects your unique storytelling abilities. Enjoy the process and have fun experimenting with different techniques!
### Materials Needed:
It seems like your request is incomplete. Could you please provide more context or specify what materials you need? For example, are you looking for materials for a specific project, event, or topic? This will help me assist you better.
**LEGO F1 Cars**: You can either use pre-built sets or create your own custom designs
LEGO offers a variety of options for enthusiasts interested in Formula 1 cars, allowing for both pre-built sets and the opportunity to create custom designs.
**Pre-Built Sets**: LEGO has released several official sets that replicate iconic Formula 1 cars and teams. These sets typically include detailed features such as aerodynamic shapes, sponsor logos, and driver minifigures. They are designed to provide an engaging building experience while capturing the essence of real-world F1 vehicles.
**Custom Designs**: For those who prefer a more personalized approach, LEGO bricks can be utilized to create custom Formula 1 cars. This allows builders to experiment with different designs, colors, and functionalities. Customization can include modifications to the chassis, wing configurations, and even the addition of unique decals.
Whether opting for a pre-built set or embarking on a custom project, LEGO F1 cars offer a creative outlet for fans of motorsport and building alike.
Hello! How can I assist you today?