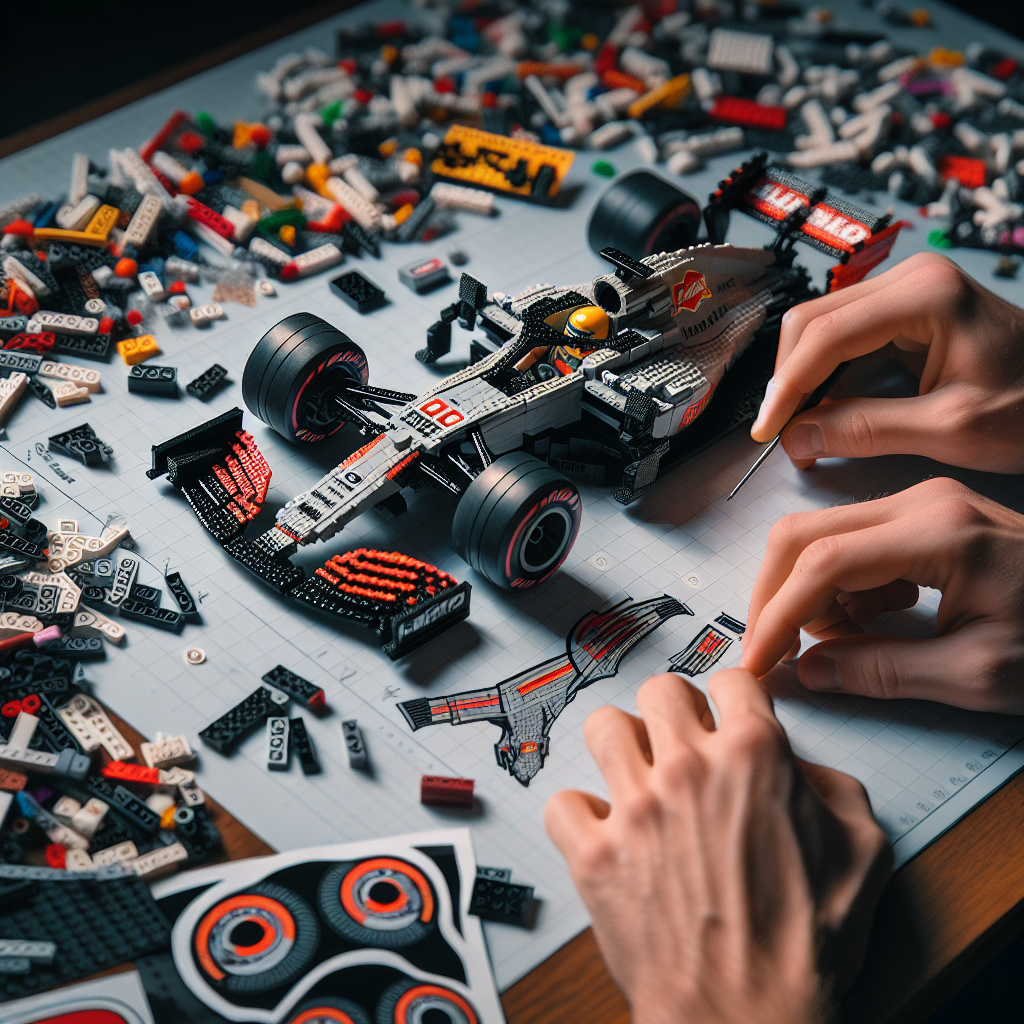
Discover tips to customize and personalize your LEGO F1 car, from unique designs to custom decals, and make your model truly one-of-a-kind!
Customizing and personalizing your LEGO F1 car can be a fun and creative process. Here are some steps and tips to help you make your LEGO F1 car unique:
### 1. **Choose Your Base Model**
– Start with a LEGO F1 car set that you like. This could be an official LEGO set or a custom design you found online.
### 2. **Select a Color Scheme**
– Decide on a color scheme that reflects your personality or favorite team. You can use stickers, paint, or different LEGO bricks to achieve this.
– Consider using colors that are not typically found in official sets for a more unique look.
### 3. **Add Custom Decals and Stickers**
– Create your own decals using printable sticker paper. You can design logos, numbers, or patterns that represent your style.
– Use existing LEGO stickers from other sets to add variety.
### 4. **Modify the Bodywork**
– Change the shape of the car by adding or removing bricks. You can create a more aerodynamic design or add features like side pods or a different front wing.
– Experiment with different LEGO pieces to create unique body shapes.
### 5. **Personalize the Driver**
– Customize the minifigure that represents the driver. You can change the helmet, torso, and legs to reflect your favorite driver or create a fictional character.
– Use custom printed minifigure parts or paint existing ones for a unique look.
### 6. **Add Accessories**
– Consider adding accessories like a pit crew, a pit stop setup, or even a trophy to enhance the overall display.
– You can also create a mini garage or racetrack scene to showcase your customized car.
### 7. **Incorporate Functional Features**
– If you’re feeling ambitious, add functional features like working steering, adjustable wings, or even a motorized element using LEGO Power Functions or LEGO Technic components.
### 8. **Experiment with Wheels and Tires**
– Swap out the wheels and tires for different styles or sizes. This can dramatically change the look of your car.
– Consider using larger or smaller wheels to create a different stance.
### 9. **Create a Unique Number Plate**
– Design a custom number plate for your car. This could be your initials, a favorite number, or a fictional racing team name.
### 10. **Showcase Your Creation**
– Once you’ve finished customizing your LEGO F1 car, find a way to display it. You can create a dedicated shelf, a display case, or even a diorama that represents a race scene.
### 11. **Document Your Work**
– Take photos of your customized car from different angles and share them on social media or LEGO fan forums. This can inspire others and allow you to connect with fellow enthusiasts.
### 12. **Join the Community**
– Engage with other LEGO fans online or in local clubs. You can share ideas, get feedback, and find inspiration for future projects.
### Conclusion
Customizing your LEGO F1 car is all about creativity and personal expression. Don’t be afraid to experiment and try new ideas. The more you personalize it, the more it will reflect your unique style and interests!
Customizing and personalizing your LEGO F1 car can be a fun and creative process. Here are some steps and tips to help you make your LEGO F1 car unique:
Customizing and personalizing your LEGO F1 car can be an enjoyable and creative endeavor. Below are some structured steps and tips to guide you through the process of making your LEGO F1 car unique:
### Steps to Customize Your LEGO F1 Car
1. **Gather Inspiration:**
– Research various F1 cars, both historical and contemporary, to identify design elements that appeal to you. Consider color schemes, sponsor logos, and aerodynamic features.
2. **Select a Base Model:**
– Choose a LEGO F1 car set that serves as your foundation. This could be an official LEGO set or a custom design you have created.
3. **Disassemble and Analyze:**
– Carefully disassemble the car to understand its structure. Take note of the components that can be modified or replaced.
4. **Choose a Color Palette:**
– Decide on a color scheme that reflects your personal style or pays homage to a favorite team or driver. Utilize LEGO bricks in various colors to achieve your desired look.
5. **Modify the Bodywork:**
– Experiment with different pieces to alter the car’s body shape. You can add or remove elements to enhance aerodynamics or aesthetics. Consider using slopes, curves, and wings to create a more dynamic appearance.
6. **Add Custom Decals:**
– Design and print custom decals or stickers to represent sponsors, numbers, or personal logos. You can use graphic design software to create these designs before printing them on adhesive paper.
7. **Incorporate Unique Features:**
– Consider adding unique features such as a detailed cockpit, custom wheels, or even a driver minifigure that resembles your favorite racer. You can also include functional elements like working steering or suspension.
8. **Test and Refine:**
– Once you have made your modifications, test the car for stability and performance. Make adjustments as necessary to ensure that it not only looks good but also functions well.
9. **Showcase Your Creation:**
– Once satisfied with your customized LEGO F1 car, consider displaying it in a dedicated space or sharing it with the LEGO community through social media or forums.
### Tips for Personalization
– **Use Rare or Unique Pieces:** Look for rare LEGO pieces or colors that can set your car apart from others.
– **Incorporate Personal Elements:** Add elements that reflect your personality, such as favorite colors, symbols, or even a personal motto.
– **Collaborate with Others:** Engage with fellow LEGO enthusiasts for ideas and feedback. Collaboration can lead to innovative designs and techniques.
– **Document Your Process:** Take photos of your customization process to share with others or to keep as a record of your creative journey.
By following these steps and tips, you can create a personalized LEGO F1 car that not only showcases your creativity but also reflects your individual style and preferences. Enjoy the process and let your imagination drive your design!
### 1. **Choose Your Base Model**
### 1. **Choose Your Base Model**
When selecting a base model for your project, it is essential to consider several key factors to ensure that the model aligns with your objectives and requirements. Below are the steps to guide you through the selection process:
#### A. **Define Your Objectives**
– Clearly articulate the goals of your project. Are you aiming for classification, regression, clustering, or another task?
– Identify the specific metrics that will determine the success of the model (e.g., accuracy, precision, recall, F1 score).
#### B. **Assess Data Availability**
– Evaluate the quantity and quality of the data you have at your disposal. Consider factors such as:
– Size of the dataset
– Diversity and representativeness of the data
– Presence of missing or noisy data
#### C. **Consider Model Complexity**
– Determine the complexity of the model in relation to your data. Simpler models may perform better with limited data, while more complex models may be necessary for larger datasets.
– Balance the trade-off between interpretability and performance. Simpler models are often easier to interpret, while complex models may yield higher accuracy.
#### D. **Review Existing Models**
– Research and review existing models that have been successfully applied to similar problems. Consider:
– Pre-trained models that can be fine-tuned for your specific task
– State-of-the-art architectures in the relevant domain (e.g., convolutional neural networks for image tasks, recurrent neural networks for sequential data)
#### E. **Evaluate Computational Resources**
– Assess the computational resources available for training and deploying the model. Consider:
– Hardware specifications (e.g., CPU, GPU)
– Time constraints for training and inference
– Budget for cloud services or infrastructure
#### F. **Select the Base Model**
– Based on the above considerations, select a base model that best fits your project’s needs. Document your rationale for choosing this model, including its strengths and potential limitations.
#### G. **Plan for Iteration**
– Be prepared to iterate on your choice of model as you gather more data and insights. Continuous evaluation and refinement are crucial for achieving optimal performance.
By following these steps, you can make an informed decision when choosing your base model, setting a solid foundation for the success of your project.
– Start with a LEGO F1 car set that you like. This could be an official set or a custom design you found online
To begin your project, select a LEGO Formula 1 car set that appeals to you. This could be an official set released by LEGO, such as the LEGO Technic series, or a custom design sourced from online platforms and communities dedicated to LEGO creations. Ensure that the set aligns with your interests in terms of design, complexity, and authenticity to the F1 racing theme. Once you have made your selection, you can proceed with the assembly and customization process, if desired.