"Share your LEGO 42096 build journey! Create an engaging video review showcasing tips, techniques, and your unique take on this intricate model."
Creating a video review of your LEGO 42096 build can be a fun and engaging way to share your experience with others. Here’s a step-by-step guide to help you create an informative and entertaining video review:
### 1. **Preparation**
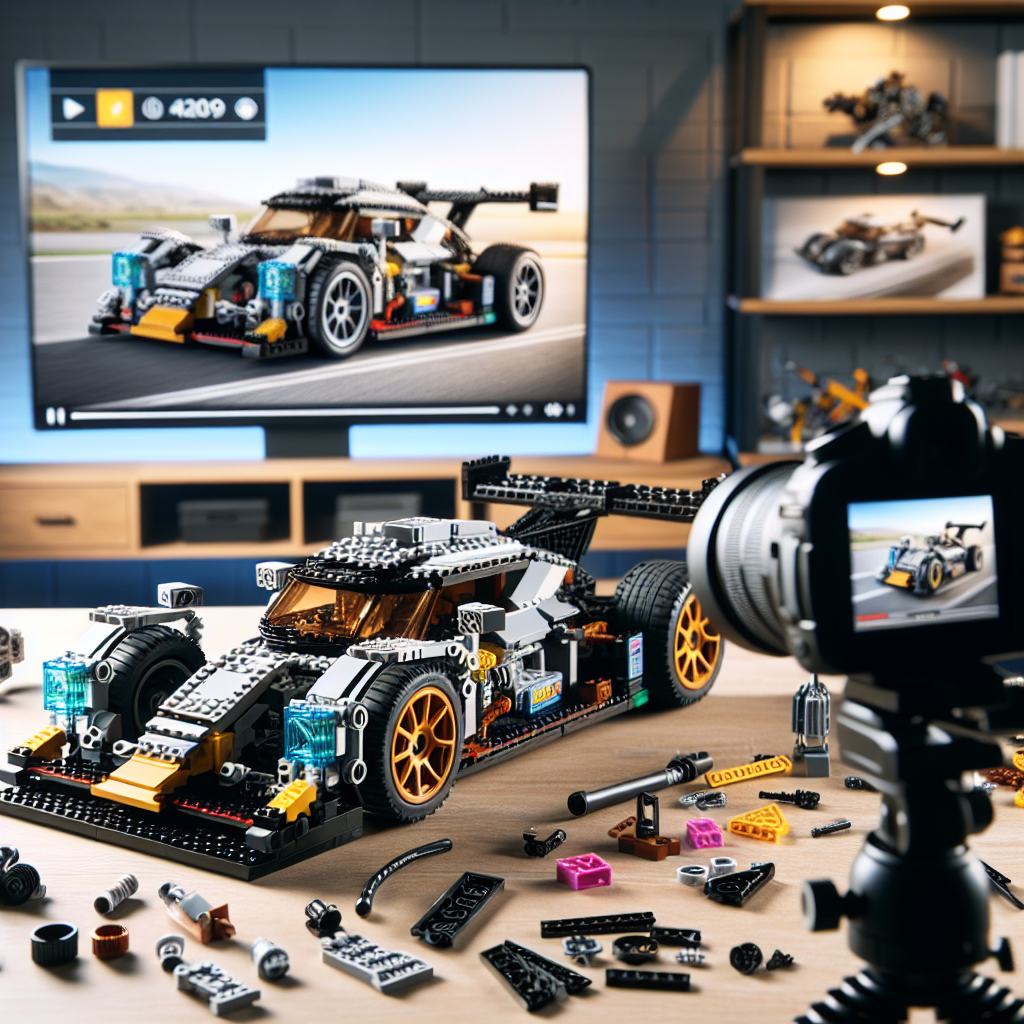
– **Gather Your Materials**: Ensure you have the LEGO 42096 set built and ready for review. Have your camera or smartphone, tripod, and any additional lighting equipment set up.
– **Script or Outline**: Create a rough outline of what you want to cover in your video. This can include an introduction, build experience, features, pros and cons, and a conclusion.
### 2. **Introduction**
– **Introduce Yourself**: Start with a brief introduction of who you are and your experience with LEGO.
– **Set Overview**: Introduce the LEGO 42096 set, mentioning its name (the “Porsche 911 RSR”), piece count, and target age group.
### 3. **Build Experience**
– **Time-Lapse or Clips**: Consider including a time-lapse of the building process or clips of you building the set. This gives viewers insight into the assembly process.
– **Discuss the Instructions**: Talk about the clarity of the instruction manual and how easy or challenging the build was.
### 4. **Features and Details**
– **Showcase the Model**: Highlight the key features of the Porsche 911 RSR, such as:
– The design and aesthetics
– Movable parts (doors, engine cover, etc.)
– Interior details
– Any unique building techniques used
– **Close-Up Shots**: Use close-up shots to show intricate details and features.
### 5. **Pros and Cons**
– **Pros**: Discuss what you liked about the set, such as:
– Build quality
– Design accuracy
– Fun factor
– **Cons**: Mention any drawbacks or challenges you faced, like:
– Complexity for younger builders
– Any missing pieces (if applicable)
### 6. **Comparison**
– If you have other LEGO car models, consider briefly comparing the 42096 with them. Discuss how it stands out or what it shares in common.
### 7. **Final Thoughts**
– **Recommendation**: Share your overall thoughts on the set and whether you would recommend it to others.
– **Target Audience**: Mention who you think would enjoy this set (e.g., car enthusiasts, LEGO fans, etc.).
### 8. **Conclusion**
– **Wrap Up**: Thank viewers for watching and encourage them to like, comment, and subscribe if they enjoyed the video.
– **Call to Action**: Invite viewers to share their own experiences with the set or ask questions in the comments.
### 9. **Editing**
– **Edit Your Video**: Use video editing software to cut unnecessary parts, add transitions, background music, and text overlays for key points.
– **Add Voiceover**: If needed, record a voiceover to clarify points or add commentary during the build clips.
### 10. **Publishing**
– **Upload to Platform**: Choose a platform (YouTube, Vimeo, etc.) to upload your video. Make sure to use relevant tags and a catchy title.
– **Engage with Viewers**: Respond to comments and engage with your audience after publishing.
### Tips for Success
– **Be Authentic**: Let your personality shine through; viewers appreciate genuine reviews.
– **Keep it Concise**: Aim for a video length that keeps viewers engaged, typically between 5-15 minutes.
– **Use Good Lighting**: Ensure your video is well-lit to showcase the details of the LEGO set effectively.
By following these steps, you can create an engaging and informative video review of your LEGO 42096 build that resonates with fellow LEGO enthusiasts!
Creating a video review of your LEGO 42096 build can be a fun and engaging way to share your experience with others. Here’s a step-by-step guide to help you create an effective and entertaining video review:
Creating a video review of your LEGO 42096 build can be an enjoyable and informative way to share your experience with fellow LEGO enthusiasts. Below is a structured guide to help you produce an effective and engaging video review.
### Step 1: Planning Your Video
1. **Define Your Audience**: Consider who your target audience is. Are they seasoned LEGO builders, casual fans, or newcomers? Tailor your content accordingly.
2. **Outline Key Points**: Create an outline of the main topics you want to cover in your review. This may include:
– Overview of the set
– Building experience
– Design and aesthetics
– Functionality and features
– Pros and cons
– Final thoughts and recommendations
### Step 2: Preparing Your Setup
1. **Choose a Location**: Select a well-lit area with minimal background noise. A clean, clutter-free space will help keep the focus on the build.
2. **Gather Equipment**: Ensure you have the necessary equipment, including:
– A camera or smartphone with good video quality
– A tripod or stabilizer for steady shots
– Good lighting (natural light or softbox lights)
– A microphone for clear audio
3. **Prepare Your Build**: Have the LEGO 42096 set fully assembled and ready for display. Consider having the original box and instruction manual on hand for reference.
### Step 3: Filming Your Review
1. **Introduction**: Start with a brief introduction of yourself and the purpose of the video. Mention the set number and name, and provide a quick overview of what viewers can expect.
2. **Showcase the Set**: Present the LEGO 42096 build from various angles. Highlight unique features, detailing, and any moving parts. Use close-up shots to emphasize intricate designs.
3. **Discuss the Building Experience**: Share your thoughts on the building process. Discuss the complexity of the build, the quality of the instructions, and any challenges you faced.
4. **Evaluate Design and Functionality**: Talk about the aesthetics of the model and its functionality. Discuss how well it represents the intended design and any interactive features.
5. **Pros and Cons**: Provide a balanced view by listing the strengths and weaknesses of the set. This could include aspects like piece quality, playability, and value for money.
6. **Final Thoughts**: Conclude your review with your overall impression of the set. Would you recommend it to others? Why or why not?
### Step 4: Editing Your Video
1. **Choose Editing Software**: Use video editing software that you are comfortable with, such as Adobe Premiere Pro, Final Cut Pro, or free options like DaVinci Resolve or iMovie.
2. **Edit for Clarity**: Trim unnecessary footage, add transitions, and ensure the video flows smoothly. Incorporate text overlays for key points or to highlight specific features.
3. **Add Background Music**: Consider adding royalty-free background music to enhance the viewing experience. Ensure it is not too loud or distracting.
4. **Include Visual Aids**: Use graphics or images to illustrate points, such as comparisons with other sets or close-ups of specific features.
### Step 5: Publishing and Promoting Your Video
1. **Choose a Platform**: Decide where to upload your video, such as YouTube, Vimeo, or social media platforms. Ensure the platform aligns with your target audience.
2. **Create an Engaging Title and Description**: Write a compelling title and description that accurately reflects the content of your video. Include relevant keywords to improve searchability.
3. **Promote Your Video**: Share your video on social media, LEGO forums, and communities. Engage with viewers by responding to comments and encouraging discussions.
4. **Seek Feedback**: Encourage viewers to provide feedback on your video. Use this input to improve future reviews.
### Conclusion
By following these steps, you can create a comprehensive and engaging video review of your LEGO 42096 build. Remember to enjoy the process and let your passion for LEGO shine through in your presentation. Happy building!
### Step 1: Preparation
### Step 1: Preparation
**Objective:** To establish a solid foundation for the task or project at hand, ensuring that all necessary resources, information, and strategies are in place for successful execution.
**Key Components:**
1. **Define Goals and Objectives:**
– Clearly articulate the purpose of the project.
– Set specific, measurable, achievable, relevant, and time-bound (SMART) goals.
2. **Conduct Research:**
– Gather relevant information and data that will inform your approach.
– Analyze existing literature, case studies, or previous projects related to your topic.
3. **Identify Stakeholders:**
– Determine who will be affected by or involved in the project.
– Engage with stakeholders to understand their needs and expectations.
4. **Resource Allocation:**
– Assess the resources required, including personnel, budget, and materials.
– Ensure that resources are available and allocated efficiently.
5. **Develop a Timeline:**
– Create a detailed timeline outlining key milestones and deadlines.
– Allow for flexibility to accommodate unforeseen challenges.
6. **Risk Assessment:**
– Identify potential risks and challenges that may arise during the project.
– Develop mitigation strategies to address these risks proactively.
7. **Establish Communication Channels:**
– Determine how information will be shared among team members and stakeholders.
– Set up regular check-ins or updates to maintain transparency and collaboration.
8. **Create a Detailed Plan:**
– Compile all the information gathered into a comprehensive project plan.
– Include sections on objectives, methodology, timeline, resources, and risk management.
By thoroughly preparing in these areas, you will lay the groundwork for a successful project execution, minimizing potential obstacles and maximizing efficiency.
**Gather Your Materials**:
**Gather Your Materials**
To ensure a successful and organized approach to your project or task, it is essential to gather all necessary materials beforehand. Below is a structured list of steps to assist you in this process:
1. **Identify Required Materials**:
– Review the project guidelines or objectives to determine what materials are necessary.
– Create a comprehensive list of items needed, including tools, resources, and any specific documents.
2. **Organize Your Workspace**:
– Clear a designated area where you will work. This will help minimize distractions and allow for efficient use of space.
– Ensure that your workspace is well-lit and equipped with any necessary technology (e.g., computer, printer).
3. **Collect Materials**:
– Gather all items on your list. This may include:
– Writing instruments (pens, pencils, markers)
– Paper (notebooks, printer paper, or specific forms)
– Digital resources (software, applications, or online tools)
– Reference materials (books, articles, or manuals)
– If applicable, ensure that any electronic devices are charged and functioning properly.
4. **Check for Completeness**:
– Review your list to confirm that you have collected all necessary materials.
– If any items are missing, make arrangements to acquire them promptly.
5. **Organize Collected Materials**:
– Arrange your materials in a logical order that aligns with your workflow. This may involve categorizing items or placing them in accessible locations.
– Consider using containers or folders to keep similar items together and maintain organization.
6. **Prepare for Use**:
– Familiarize yourself with any tools or resources that you will be using. This may involve reading instructions or conducting a brief trial run.
– Ensure that all materials are in good condition and ready for use.
By following these steps, you will create a conducive environment for productivity and enhance your ability to complete your project efficiently.