"Discover the ultimate guide to building a LEGO Technic car from scratch! Tips, tricks, and step-by-step instructions for a successful assembly."
Assembling a LEGO Technic car can be a rewarding and enjoyable experience. Here’s a step-by-step guide to help you successfully build your own LEGO Technic car from scratch:
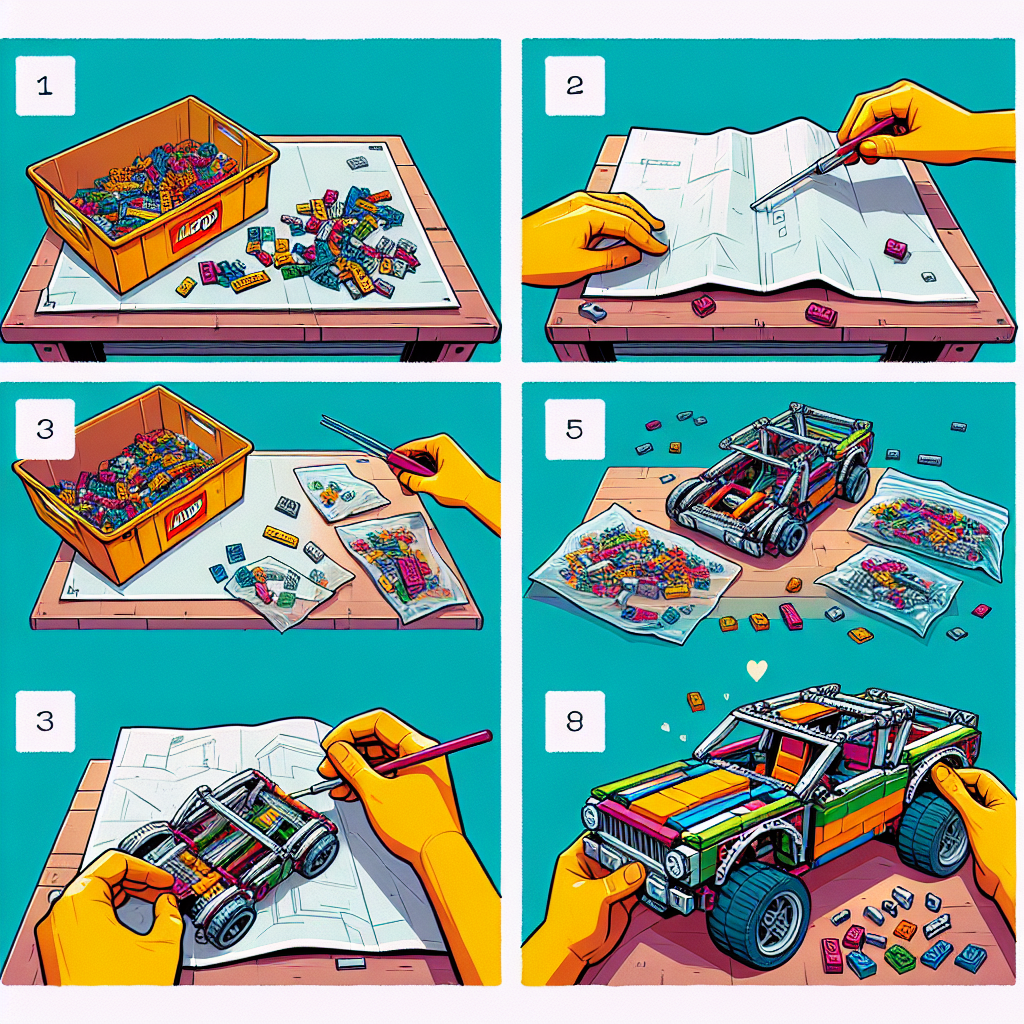
### Step 1: Gather Your Materials
– **LEGO Technic Set**: Choose a set that includes all the necessary pieces. If you’re starting from scratch, consider purchasing a Technic car kit or a bulk set of Technic pieces.
– **Instructions**: If you have a specific model in mind, make sure to have the building instructions. You can often find these on the LEGO website or in the box if you purchased a set.
– **Workspace**: Find a clean, flat surface to work on. A large table or desk is ideal.
### Step 2: Organize Your Pieces
– **Sort the Pieces**: Before you start building, sort the LEGO pieces by type (e.g., beams, gears, wheels) and color. This will make it easier to find the pieces you need as you follow the instructions.
– **Check Inventory**: If you’re using a specific set, check the inventory list to ensure you have all the pieces.
### Step 3: Understand the Basics of LEGO Technic
– **Familiarize Yourself with Technic Elements**: LEGO Technic uses specialized pieces like beams, axles, gears, and connectors. Understanding how these pieces work together is crucial.
– **Learn About Functions**: Many Technic models have moving parts and functions (like steering, suspension, or engines). Familiarize yourself with how these mechanisms operate.
### Step 4: Follow the Instructions
– **Step-by-Step Building**: Follow the building instructions step by step. Take your time and don’t rush through the process.
– **Check Each Step**: After completing each step, double-check your work to ensure everything is assembled correctly before moving on.
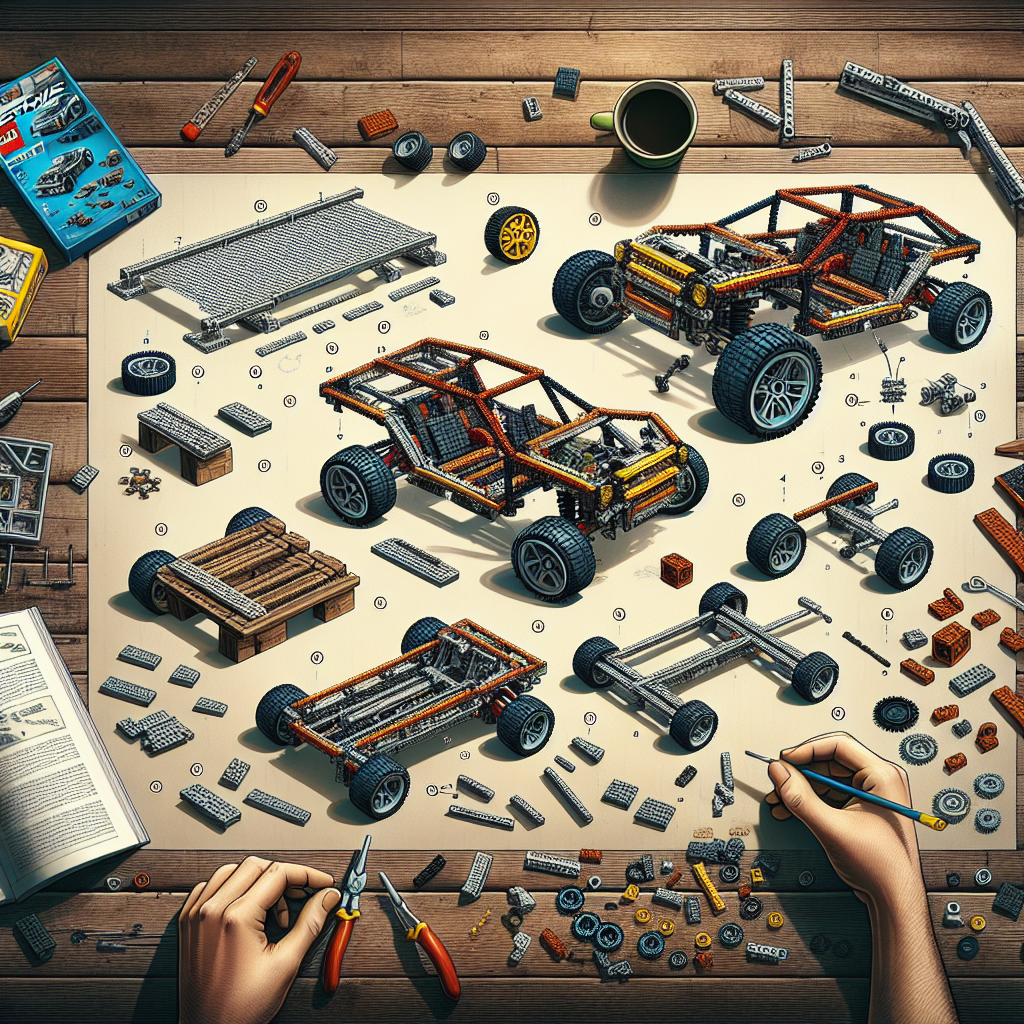
### Step 5: Assemble the Chassis
– **Build the Base**: Start by constructing the chassis, which is the foundation of your car. This typically involves connecting beams and axles to create a sturdy frame.
– **Add Wheels and Axles**: Attach the wheels and axles to the chassis. Make sure they spin freely and are securely attached.
### Step 6: Add the Body and Features
– **Construct the Body**: Once the chassis is complete, begin building the body of the car. This may include adding panels, seats, and other aesthetic features.
– **Incorporate Functions**: If your model has moving parts (like doors, hoods, or engines), make sure to integrate these features as you build.
### Step 7: Test the Mechanisms
– **Check Moving Parts**: After assembling the car, test any moving parts to ensure they function correctly. This includes steering, suspension, and any other mechanisms.
– **Make Adjustments**: If something isn’t working as expected, review the instructions and make any necessary adjustments.
### Step 8: Final Touches
– **Add Details**: Once the main structure is complete, add any final details like stickers, decals, or additional accessories to enhance the look of your car.
– **Inspect Your Work**: Take a moment to inspect your completed model. Ensure everything is secure and functioning as intended.
### Step 9: Enjoy Your Creation
– **Display or Play**: Once your LEGO Technic car is complete, you can display it or take it for a spin! Enjoy the fruits of your labor and consider sharing your creation with friends or online communities.
### Step 10: Explore Further
– **Experiment with Modifications**: Once you’re comfortable with building, consider modifying your design or creating your own custom Technic car using the pieces you have.
– **Join the Community**: Engage with other LEGO enthusiasts online or in local clubs to share ideas, tips, and inspiration for future builds.
By following these steps, you’ll be well on your way to successfully assembling a LEGO Technic car. Enjoy the building process and have fun with your new creation!
Assembling a LEGO Technic car can be a rewarding and enjoyable experience. Here’s a step-by-step guide to help you successfully build your own LEGO Technic car from scratch:
### Step-by-Step Guide to Assembling a LEGO Technic Car
Building a LEGO Technic car can be a fulfilling and enjoyable endeavor. This guide provides a structured approach to help you successfully construct your own LEGO Technic car from scratch.
#### Materials Required:
1. **LEGO Technic Set**: Ensure you have a comprehensive set that includes various beams, axles, gears, wheels, and connectors.
2. **Building Instructions**: If available, refer to the official instructions provided with your set or consider using online resources for inspiration.
3. **Workspace**: A clean, flat surface to facilitate the assembly process.
#### Step 1: Planning Your Design
– **Conceptualize**: Decide on the type of car you wish to build (e.g., sports car, off-road vehicle, etc.).
– **Sketch**: Create a rough sketch of your design, noting key features such as the chassis, wheels, and any additional mechanisms (e.g., steering, suspension).
#### Step 2: Gather Your Components
– **Sort Pieces**: Organize your LEGO Technic pieces by type and size. This will streamline the assembly process.
– **Inventory Check**: Ensure you have all necessary components before beginning the build.
#### Step 3: Construct the Chassis
– **Base Structure**: Start by building the base of the car using long beams to create a sturdy foundation.
– **Reinforcement**: Add cross beams for additional support and stability.
– **Dimensions**: Ensure the chassis is proportionate to the desired size of the car.
#### Step 4: Add the Wheels and Axles
– **Axle Placement**: Insert axles through the designated holes in the chassis to support the wheels.
– **Wheel Attachment**: Secure the wheels onto the axles, ensuring they rotate freely.
#### Step 5: Build the Body
– **Side Panels**: Attach beams vertically to form the sides of the car.
– **Front and Rear**: Construct the front and rear sections, incorporating design elements such as a hood or trunk.
– **Aerodynamics**: Consider the shape of the body for improved aesthetics and performance.
#### Step 6: Integrate Functional Features
– **Steering Mechanism**: If desired, implement a steering system using gears and a steering wheel.
– **Suspension**: Add suspension components to enhance the car’s performance on uneven surfaces.
– **Engine Details**: Create a representation of an engine if your design includes an open hood.
#### Step 7: Final Assembly and Detailing
– **Connect Components**: Ensure all parts are securely connected and that moving parts function correctly.
– **Aesthetic Touches**: Add decorative elements such as stickers, lights, or custom paint to enhance the visual appeal of your car.
#### Step 8: Testing and Adjustments
– **Functionality Test**: Roll the car on a flat surface to test its movement and steering capabilities.
– **Adjustments**: Make any necessary adjustments to improve performance or stability.
#### Step 9: Enjoy Your Creation
– **Display**: Showcase your completed LEGO Technic car as a testament to your building skills.
– **Share**: Consider sharing your design and experience with fellow LEGO enthusiasts, either online or in person.
### Conclusion
Assembling a LEGO Technic car is not only a creative outlet but also an opportunity to develop problem-solving skills and engineering concepts. By following this structured guide, you can successfully build a unique and functional LEGO Technic car that reflects your personal style and ingenuity. Enjoy the process and happy building!
### Step 1: Gather Your Materials
### Step 1: Gather Your Materials
To ensure a successful and efficient process, it is essential to collect all necessary materials prior to commencing your project or task. This preparation will facilitate a smoother workflow and minimize interruptions. Below is a comprehensive list of items you may need to consider:
1. **Documentation**:
– Project guidelines or specifications
– Relevant research materials or references
– Any necessary forms or templates
2. **Tools and Equipment**:
– Specific tools required for the task (e.g., software, hardware, or manual tools)
– Safety equipment, if applicable (e.g., gloves, goggles)
3. **Supplies**:
– Consumables such as paper, ink, or other materials pertinent to the task
– Organizational materials (e.g., folders, binders, or storage solutions)
4. **Technology**:
– Computer or device with necessary software installed
– Internet access for research or communication purposes
5. **Workspace**:
– A clean and organized area conducive to productivity
– Adequate lighting and ergonomic considerations
6. **Support Resources**:
– Contact information for team members or stakeholders
– Access to technical support or customer service, if needed
By systematically gathering these materials, you will be well-prepared to proceed with your project, ensuring that you have everything at your disposal to achieve your objectives efficiently.
– **LEGO Technic Set**: Choose a set that includes all the necessary pieces. If you’re starting from scratch, consider purchasing a Technic car kit or gathering individual pieces
When selecting a LEGO Technic set, it is essential to choose one that includes all the necessary components for assembly and functionality. If you are a beginner or starting from scratch, I recommend considering a complete Technic car kit, as these sets typically provide a comprehensive range of pieces and instructions tailored for building vehicles.
Alternatively, if you prefer a more customized approach, you may opt to gather individual pieces. This method allows for greater flexibility in design and creativity, but it requires a more extensive understanding of the specific components needed for your intended build.
In either case, ensure that the set or pieces you select align with your skill level and desired complexity, as LEGO Technic sets can vary significantly in terms of difficulty and the number of pieces included.