Discover creative ways to display your LEGO cars using shelves and frames. Transform your walls into a stunning showcase for your favorite builds!
Hanging LEGO cars on walls using shelves and frames can be a creative and visually appealing way to display your collection. Here’s a step-by-step guide on how to do it:
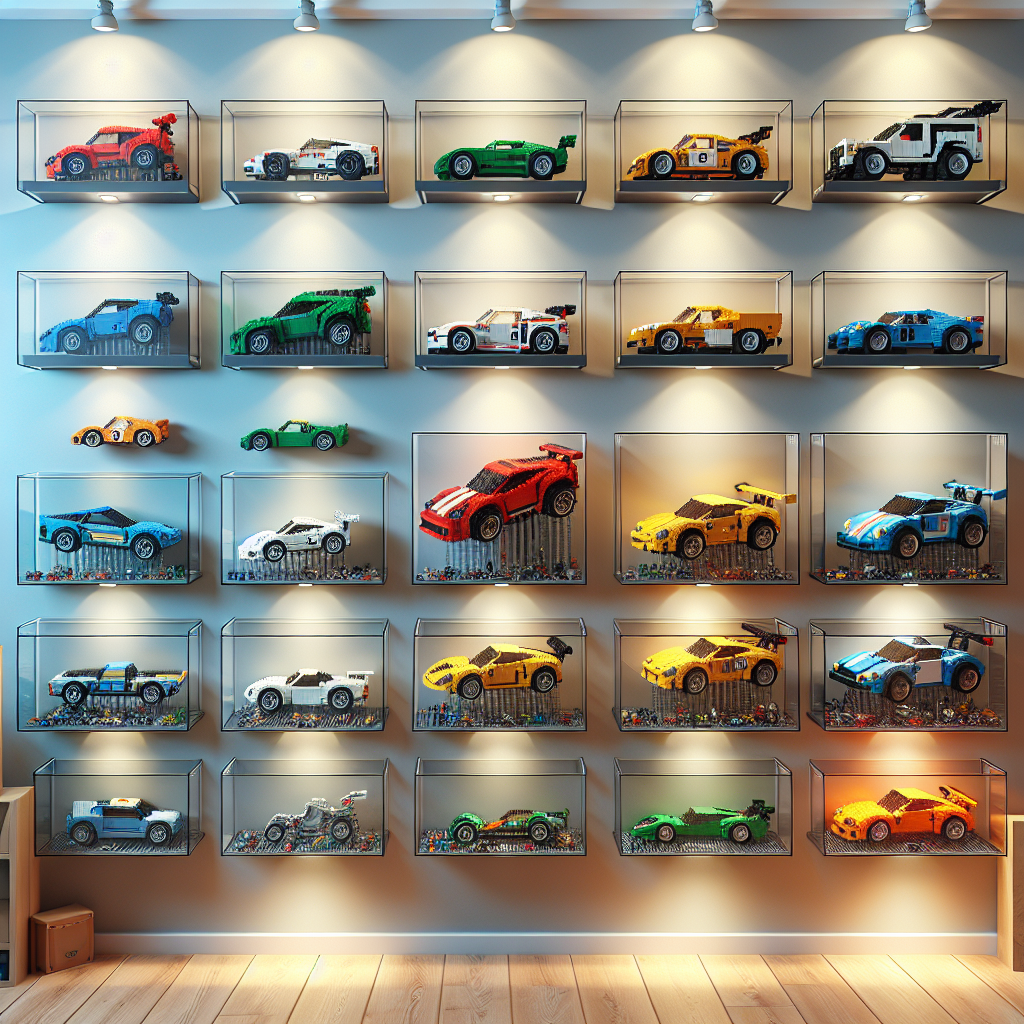
### Materials Needed: 1. **Shelves or Shadow Boxes**: Choose shelves or shadow boxes that fit the size of your LEGO cars. Floating shelves or deep frames work well. 2. **Mounting Hardware**: Depending on the type of shelves or frames, you may need brackets, screws, or adhesive strips. 3. **LEGO Cars**: Your collection of LEGO cars. 4. **Display Stands (Optional)**: Small stands or bases to elevate the cars if needed. 5. **Level**: To ensure your shelves are straight. 6. **Measuring Tape**: For accurate placement. 7. **Drill or Screwdriver**: For mounting shelves. 8. **Wall Anchors (if needed)**: For added support, especially if mounting on drywall.
### Steps to Hang LEGO Cars:
1. **Choose the Location**: – Select a wall space that is visible and accessible. Consider the height and lighting for the best display.
2. **Select Shelves or Frames**: – Decide whether you want to use open shelves or enclosed shadow boxes. Open shelves allow for easy access, while shadow boxes can protect the cars from dust.
3. **Plan the Layout**: – Before mounting, lay out your LEGO cars on the floor or a table to visualize how you want them displayed. Consider grouping them by color, size, or theme.
4. **Measure and Mark**: – Use a measuring tape to determine where you want to place the shelves. Mark the spots on the wall with a pencil for accurate placement.
5. **Install the Shelves**: – Follow the manufacturer’s instructions to mount the shelves or frames securely. Use a level to ensure they are straight.
6. **Prepare the LEGO Cars**: – If you want to keep the cars secure, consider using small display stands or bases. You can also use adhesive putty or double-sided tape to keep them in place.
7. **Arrange the Cars**: – Place your LEGO cars on the shelves or inside the frames. Experiment with different arrangements until you find one that looks appealing.
8. **Add Finishing Touches**: – Consider adding labels, decorative elements, or background art to enhance the display. You can also use LED strip lights to highlight the cars.
9. **Regular Maintenance**: – Dust the display regularly to keep it looking fresh. If using adhesive, check periodically to ensure the cars remain secure.
### Tips: – **Safety First**: Ensure that the shelves are securely mounted to avoid accidents, especially if you have children or pets. – **Personalize**: Add personal touches like photos or memorabilia related to your LEGO collection. – **Change It Up**: Don’t hesitate to rearrange your display from time to time to keep it fresh and interesting.
By following these steps, you can create a stunning display of your LEGO cars that showcases your collection while adding a unique decorative element to your space. Enjoy your creative project!
Hanging LEGO cars on walls using shelves and frames can be a creative and visually appealing way to display your collection. Here’s a step-by-step guide on how to do it:
**Step-by-Step Guide to Displaying LEGO Cars on Walls Using Shelves and Frames**
**Introduction:** Displaying LEGO cars on walls can transform your collection into an eye-catching piece of art. This guide provides a formal approach to creating an organized and aesthetically pleasing display using shelves and frames.
**Materials Needed:** 1. LEGO cars for display 2. Floating shelves or shadow boxes 3. Picture frames (optional) 4. Wall mounting hardware (screws, anchors, etc.) 5. Level 6. Measuring tape 7. Pencil 8. Drill or screwdriver 9. Optional: Decorative elements (e.g., LED lights, background paper)
**Step 1: Plan Your Display** – **Select a Location:** Choose a wall that is visible and has enough space for your display. – **Design Layout:** Sketch a layout of how you want to arrange the LEGO cars. Consider the number of shelves or frames you will use and the spacing between them.
**Step 2: Gather Materials** – Purchase or gather the necessary materials listed above. Ensure that the shelves or frames are suitable for the weight and size of your LEGO cars.
**Step 3: Measure and Mark** – Use a measuring tape to determine the height and spacing of the shelves or frames. – Mark the desired locations on the wall with a pencil, ensuring they are level.
**Step 4: Install Shelves or Frames** – **For Floating Shelves:** – Follow the manufacturer’s instructions for installation. Typically, this involves drilling holes for wall anchors and securing the shelf brackets. – **For Shadow Boxes or Picture Frames:** – Use a level to ensure they are straight, then drill holes and secure them to the wall with appropriate hardware.
**Step 5: Arrange LEGO Cars** – Carefully place your LEGO cars on the installed shelves or within the frames. Consider arranging them by color, size, or theme for a cohesive look. – If using frames, you may want to add a background (e.g., colored paper or fabric) to enhance the visual appeal.
**Step 6: Optional Enhancements** – Consider adding LED lights to highlight your display. These can be installed along the shelves or inside the frames. – Incorporate decorative elements such as small plants or themed accessories to complement your LEGO cars.
**Step 7: Final Adjustments** – Step back and assess the display from different angles. Make any necessary adjustments to the arrangement of the LEGO cars or the positioning of the shelves/frames.
**Conclusion:** By following these steps, you can create a stunning display of your LEGO cars that not only showcases your collection but also enhances the aesthetic of your space. Enjoy your new decorative arrangement and the admiration it will surely receive!
### Materials Needed:
It seems like your request is incomplete. Could you please provide more context or specify what materials you need? For example, are you looking for materials for a specific project, event, or purpose? This will help me assist you better.
**Shelves or Shadow Boxes**: Choose shelves or shadow boxes that fit the size of your LEGO cars. Floating shelves or deep frames work well
When selecting a display option for your LEGO cars, consider the following formal recommendations:
**Shelves**: Opt for floating shelves that provide a sleek and modern aesthetic. Ensure that the shelves are deep enough to accommodate the dimensions of your LEGO cars without risk of them falling off. Choose materials such as wood or glass to enhance the visual appeal and durability of the display. Arrange the cars in a way that allows for easy viewing while maintaining an organized appearance.
**Shadow Boxes**: Alternatively, shadow boxes offer a unique way to showcase your LEGO cars while protecting them from dust and damage. Select shadow boxes with a depth that allows for the cars to be displayed without being cramped. Consider using a background that complements the colors of the cars, such as a neutral or contrasting hue, to enhance their visibility. Shadow boxes can be hung on walls or placed on shelves, providing versatility in your display options.
In both cases, ensure that the chosen display method aligns with your overall decor and enhances the aesthetic of the space.
The Display Frame for Technic™ Supercar is a premium showcase designed to elegantly present your Technic™ Supercar model. Key features include a durable, transparent acrylic construction that protects the model from dust while providing a clear view from all angles. The frame is easy to assemble and includes a sturdy base for stability. Benefits include enhanced visibility of your model, preservation of its condition, and a stylish addition to any display space. Unique selling points are its compatibility with various Technic™ Supercar models, customizable design options, and the ability to elevate your collection’s aesthetic appeal, making it a must-have for enthusiasts and collectors alike.